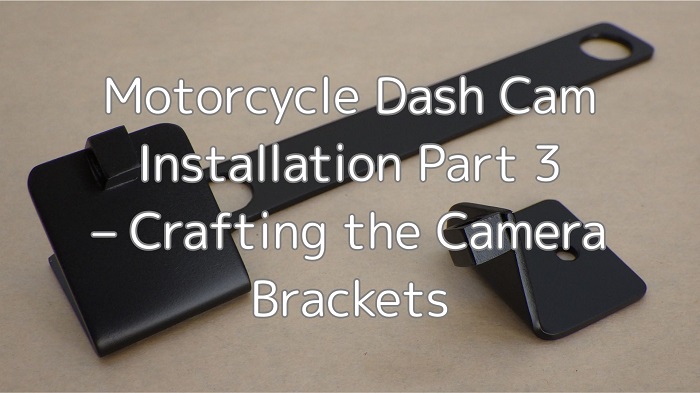
In this third installment, I’ll be fabricating brackets for the dashcam cameras.
To mount them at the locations decided in the maintenance record “Motorcycle Dash Cam Installation Part 1 – Planning the Setup”, the brackets will be designed with the following points in mind:
- Ensure the camera and bracket shape/position do not interfere with the motorcycle body
- Determine a secure method of fastening both the camera and bracket
I’ll use slightly thicker 2mm aluminum plates this time to ensure the bracket doesn’t bend easily, even if impacted.
From this article, you’ll learn:
- How to make a dashcam camera bracket
- How to mount the bracket to the motorcycle and camera
| Date | 5th February 2023 |
| Subjects | Tuning, Customizing |
| Shop or DIY | DIY |
| Difficulty | |
| Working hours | 12 |
| Costs [Yen] | 4.130 |
Although the official work date is listed as February 5, 2023, steps beyond STEP 9 were completed in November.
1. Goods to use
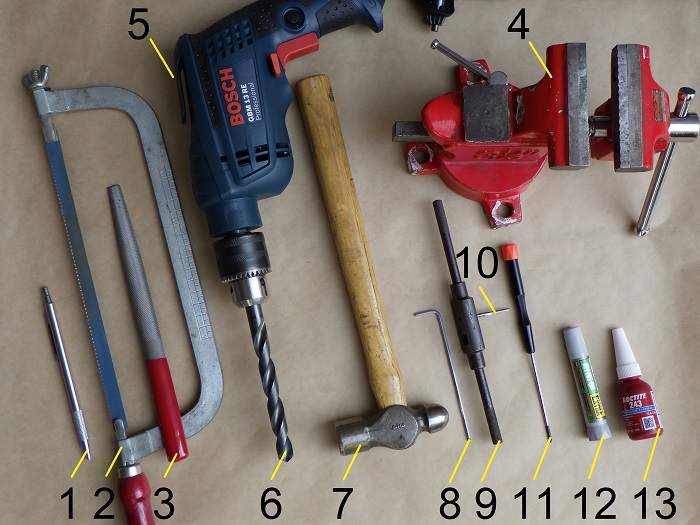
| No. | Product name | Manufacturer | Product number | Quality | Amounts[Yen] | Purchase this time |
| ST2 | Aluminum sheet (2.0mm) | HIKARI | HA2013 | 1 | 527 | ○ |
| 1 | Pencil-type scriber | STRAIGHT | 19-640 | 1 | 980 | |
| 2 | Handsaw | – | – | 1 | 670 | |
| 3 | Metal file | – | – | 1 | 417 | |
| 4 | Vice 90mm | Fujiwara Industrial | 220915 | 1 | (4,398) | |
| 5 | Power drill | Bosch | GBM13RE | 1 | 22,880 | |
| 6 | Drill (13 and 2.5, 5, 10mm) | – | – | 1 each | 1,768 | |
| ST6 | Waterproof sandpaper (#800) | TAKAGI | – | 1 | 148 | ○ |
| 7 | Hammer | – | – | 1 | 1,648 | |
| ST8 | Lightweight putty | SOFT99 | 006 | 1 | 632 | ○ |
| ST10 | Drill (4mm) | – | – | 1 | 120 | |
| 8 | Long hexagon wrench (2.5mm) | KTC | HLD150-2.5 | 1 | 495 | |
| ST15 | Aluminum square rod (8×8mm) | HIKARI | AS6081 | 1 | 912 | ○ |
| ST16 | Drill (1.6mm) | – | – | 1 | 140 | |
| 9 | Tap handle | – | – | 1 | 912 | |
| 10 | Tap (M2×0.4) | MONOTARO | 31466113 | 1 | 692 | ○ |
| ST20 | Flat head screw (M2×4) | YAHATANEJI | 582 | 1 | 140 | ○ |
| 11 | Phillips screwdriver (No. 00×75) | VESSEL | 125604 | 1 | 417 | |
| 12 | Instant glue EXTRA | KONISHI | – | 1 | 659 | |
| 13 | Thread locking compound | LOCTITE | 243 | 1 | 879 | |
| ST27 | Paint Matte black | SOFT99 | – | 1 | 1,079 | ○ |
| 40,513 | 4,130 |
2. Crafting the Camera Brackets (STEP 1–29)
Sample made from cardboard
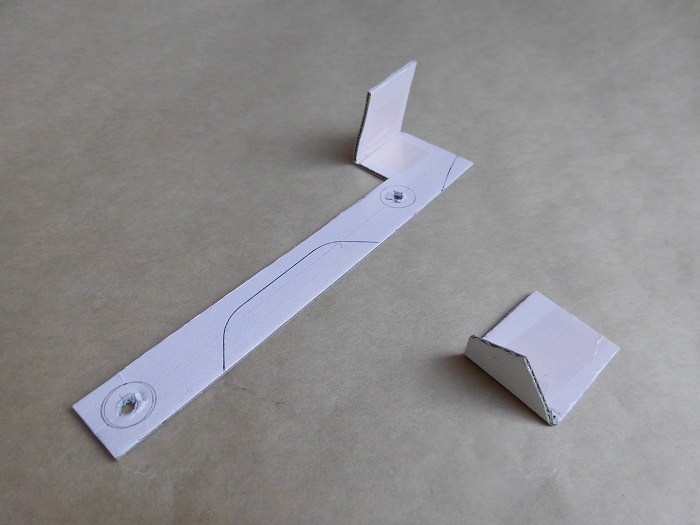
<Sample made from cardboard>
First, I created a cardboard mockup by positioning it against the motorcycle to adjust the shape and placement.
This sample will serve as the template for fabricating the actual aluminum bracket.
Marking the aluminum plate
I started with the more complex rear bracket.
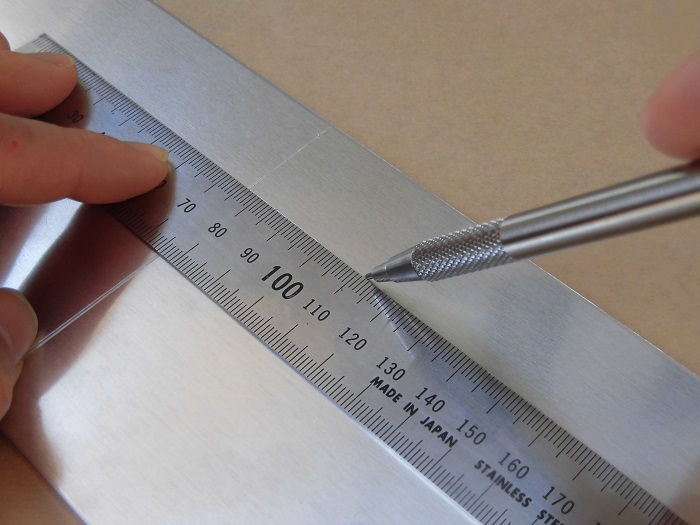
<Marking the aluminum plate>
Using a scribing tool, I marked:
- Cut lines
- Bend points
- Drill hole locations
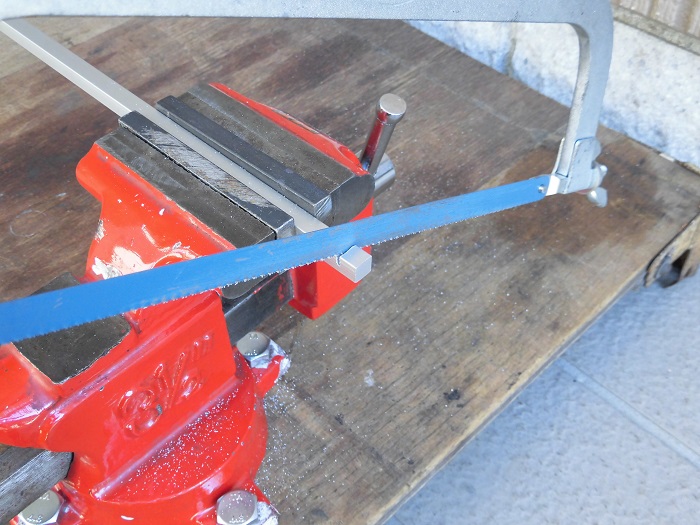
Cutting aluminum plate 1
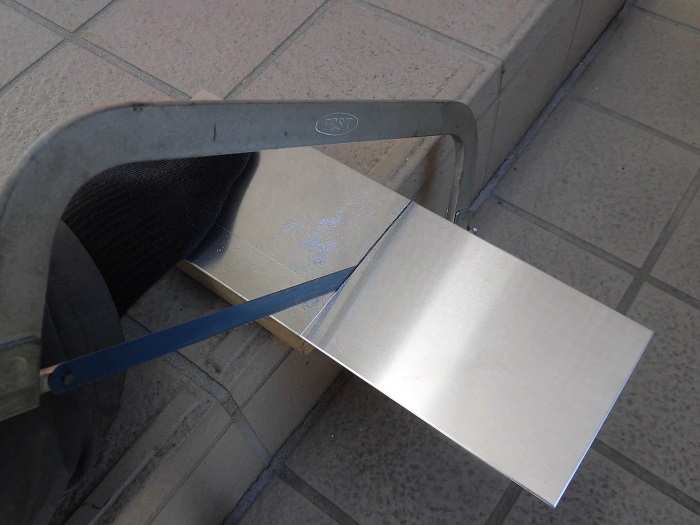
<Cutting aluminum plate 1>
Using a handsaw, I began cutting the plate.
Online sources suggest that scoring the surface with a P-cutter allows for easier bending,
which might be more convenient when cutting out the outer shape.
Smoothing the Cut Edges
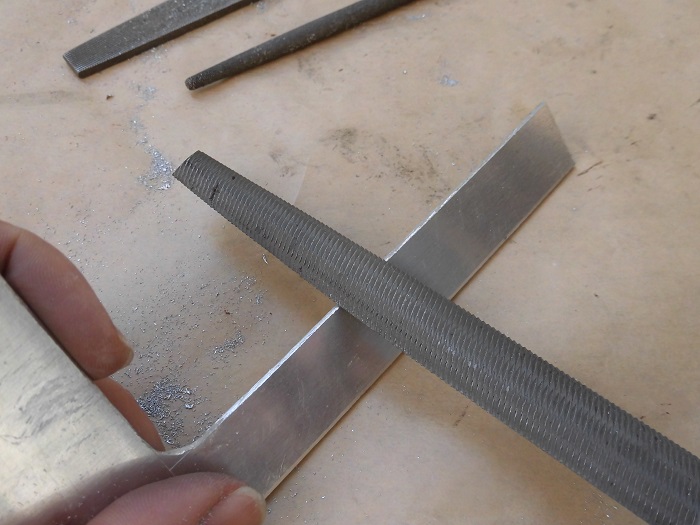
<Smoothing the Cut Edges>
Filed down rough cuts made by the handsaw, removing sharp burrs and major irregularities.
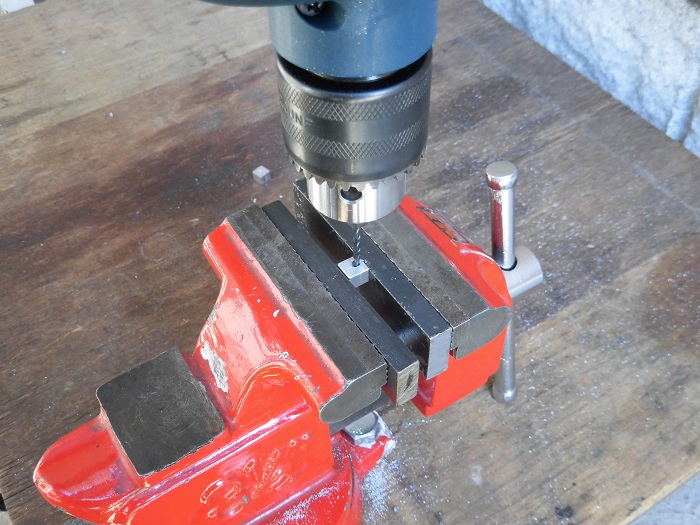
Drilling Holes 1
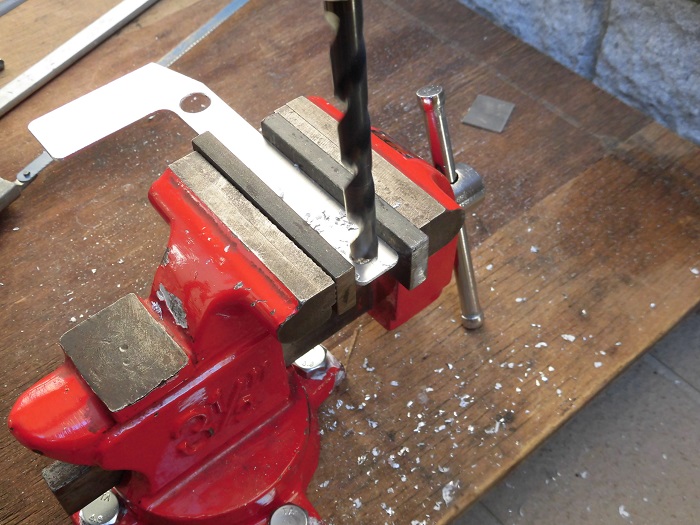
<Drilling Holes 1>
Drilled two 13mm holes and one 2.5mm hole.
To ease drilling, gradually widened the larger holes: 2.5 → 5 → 10 → 13mm.
Note: Although the license plate bolts are 6mm, the 13mm diameter was intentional and will be explained later.
The 2.5mm hole is for mounting the camera base.
Edge & Surface Finishing
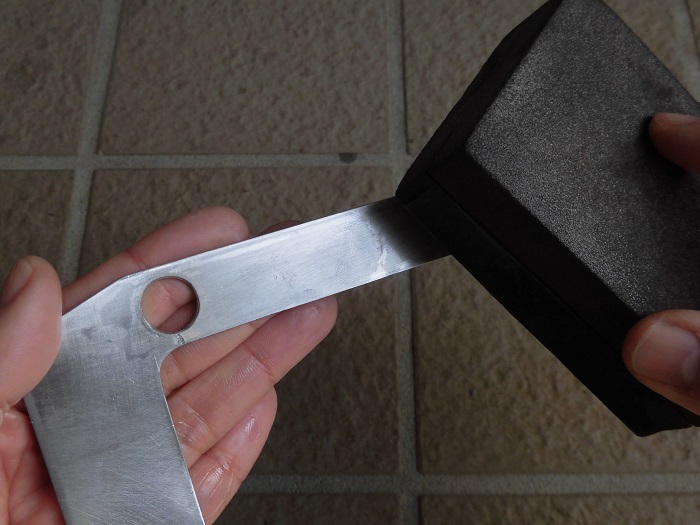
<Edge & Surface Finishing>
Before bending, polished the cut edges and removed fine surface scratches caused during processing using #800 sandpaper.
Also served as surface prep for painting.
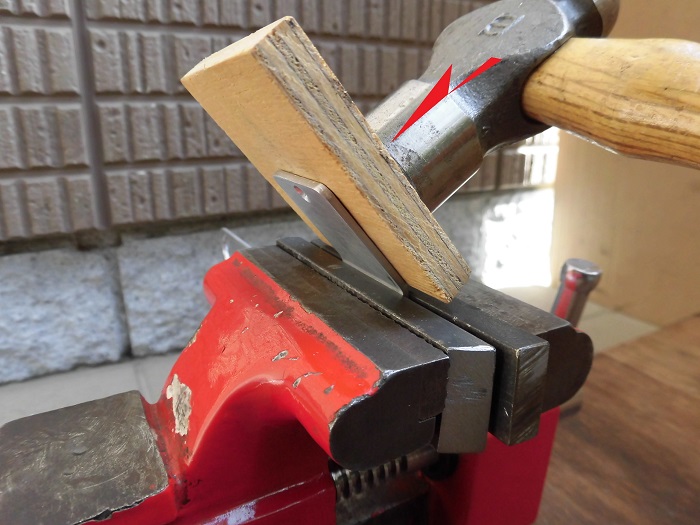
Bending the Aluminum Plate 1
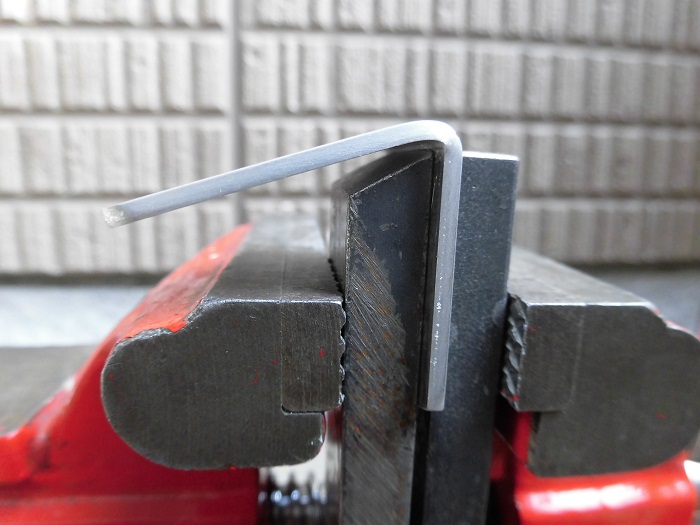
<Bending the Aluminum Plate 1>
Clamped the plate in a vise and hammered it to bend.
Used a diagonally filed flat bar to achieve sharper angles.
Filling Scratches with Putty
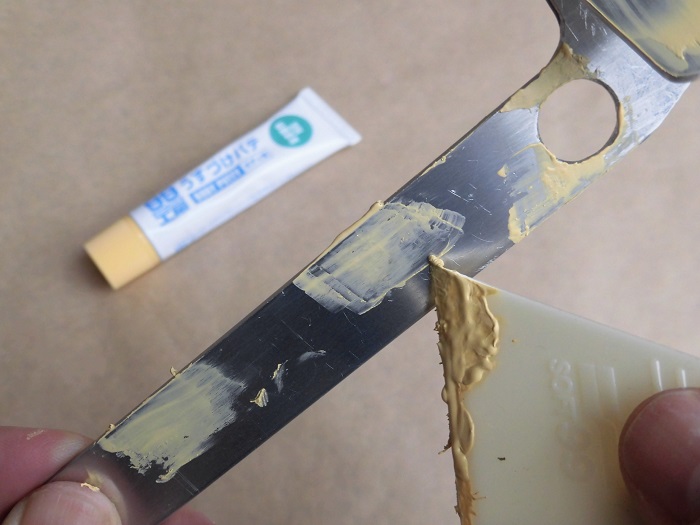
<Filling Scratches with Putty>
Although I intended to finish everything with sanding in STEP 6, deeper-than-expected scratches required putty for correction.
Cutting aluminum plate 2
Next up: the front bracket.
Used leftover material from the rear bracket.
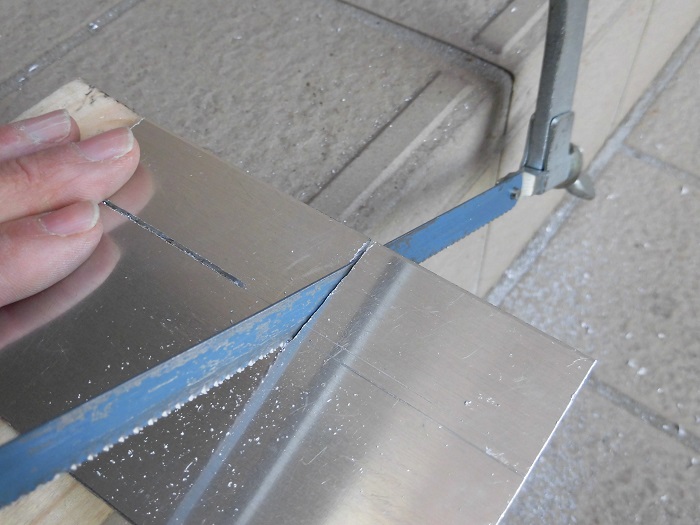
<Cutting aluminum plate 2>
Cut again using a handsaw, then smoothed the edges.
Handsawing takes effort—both pressing and cutting require muscle. Maybe the blade’s worn?
Drilling Holes 2
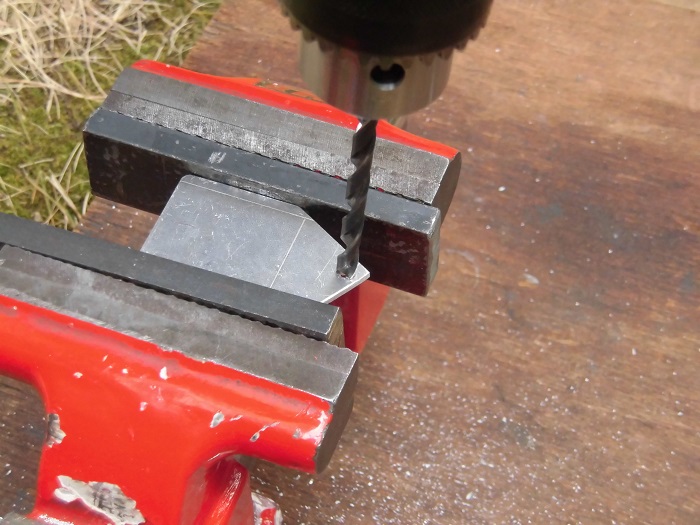
<Drilling Holes 2>
Drilled one 4mm hole and one 2.5mm hole.
The 2.5mm hole was countersunk afterward.
Bending Aluminum Plate 2
<Bending Aluminum Plate 2>
Bent the front bracket at a clean 90° angle.
Putty was again used to fill surface imperfection.
Camera Mount Base
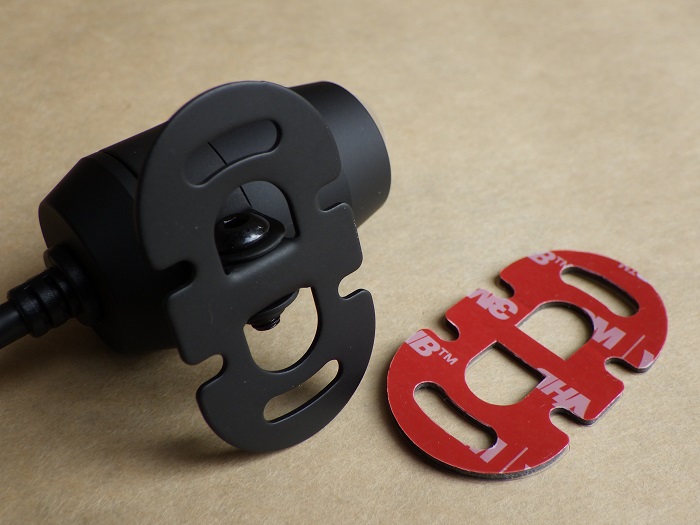
<Camera Mount Base>
The bundled dashcam base is easy to install and sturdy.
It won’t loosen under normal conditions, but its generic design can feel “tacked-on.”
Also, mud collects in its grooves—not ideal for cleaning.
So, I decided to fabricate a custom mount as well.
Removing the Camera Mount
<Removing the Camera Mount>
Used a 2.5mm hex wrench to unscrew and remove the camera and its mount.
One screw releases all components.
Camera Mount Parts List
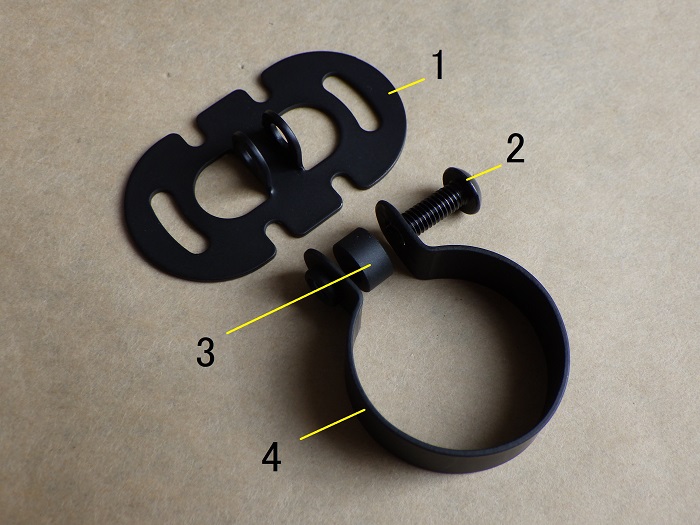
<Camera Mount Parts List>
From top to bottom:
- Base
- M4 Screw
- Spacer
- Camera Ring
Plan: fabricate a custom block, sandwich it using the camera ring, and fasten with the 2. M4 screw.
Cutting the Aluminum Bar
Next up: the blokes for brackets
Used an 8mm square bar.
<Cutting the Aluminum Bar>
Cut two 7mm-wide blocks from a 1m aluminum piece—one each for front and rear.
Couldn’t find smaller stock sizes, so the leftovers become part of the “Green^2 Garage archive”
Drilling the Block
<Drilling the Block>
Drilled:
- 4mm hole for the camera ring screw
- 1.6mm hole as pilot for the bracket mount screw (M2)
Block with Drilled Holes
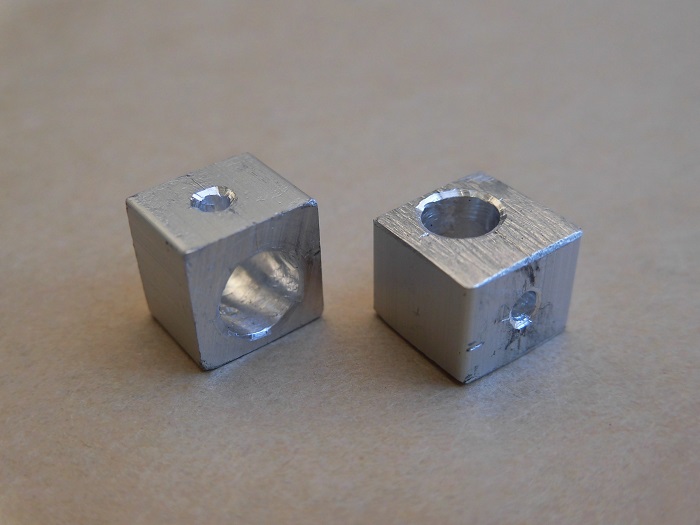
<Block with Drilled Holes>
One hole was misaligned, so I enlarged it from 4mm to 5mm to adjust.
Threading the Screw Hole
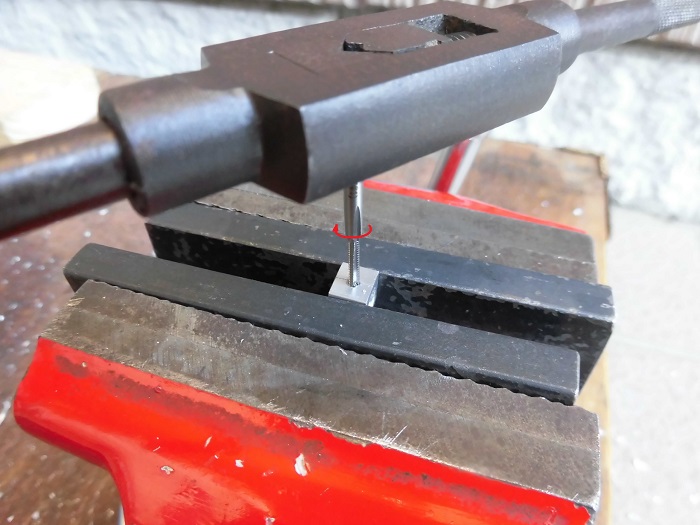
<Threading the Screw Hole>
Tapped the 1.6mm pilot hole for M2 threads using a small tap.
Carefully turned the handle to avoid snapping the tool.
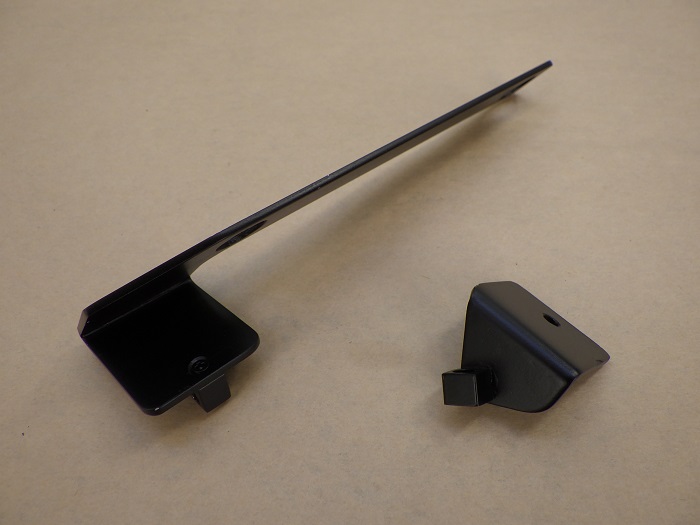
Bracket and Block After Machining
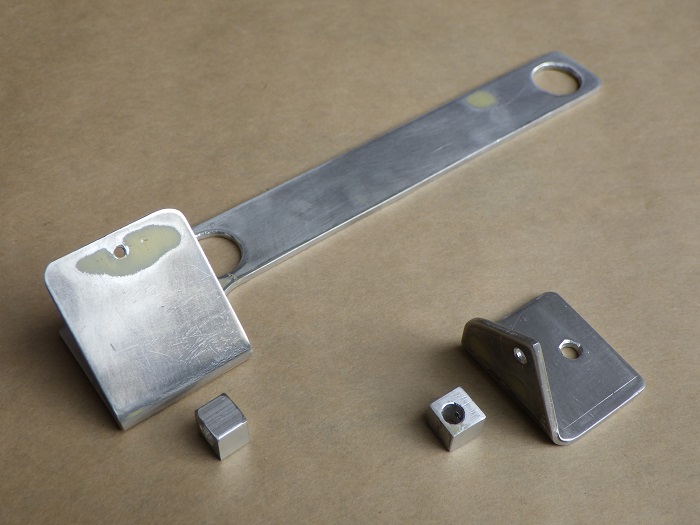
<Bracket and Block After Machining>
Final results.
Hole sizes vary and shapes are irregular—but hey, that’s the charm of one-off fabrication.
Test Assembly of Bracket
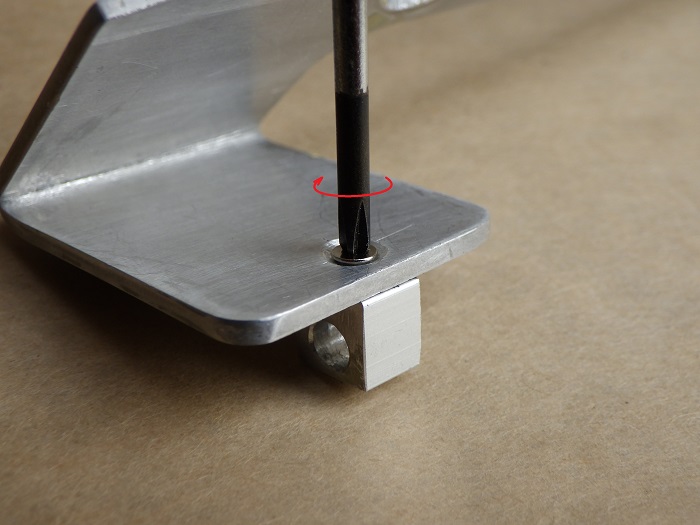
<Test Assembly of Bracket>
Mounted the base using countersunk M2 screws.
Used temporary screws to fine-tune camera position before final adhesive fixation.
Test-Fitting the Camera
<Test-Fitting the Camera>
Inserted the camera ring into the block and fastened with the M4 screw using a 2.5mm hex wrench.
Camera Test-Fitted to Bracket
<Camera Test-Fitted to Bracket>
The bracket now holds the camera properly.
Many trial-and-error iterations, so seeing it take shape was genuinely satisfying.
Checking Camera Installation
Mounted the bracket to the motorcycle to verify:
- Field of view
- Camera angle
- Potential interference with other parts
Photos will be revealed later—stay tuned!
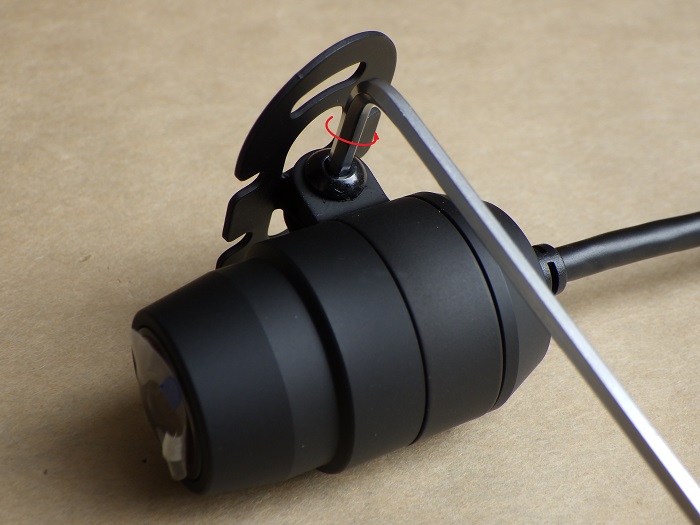
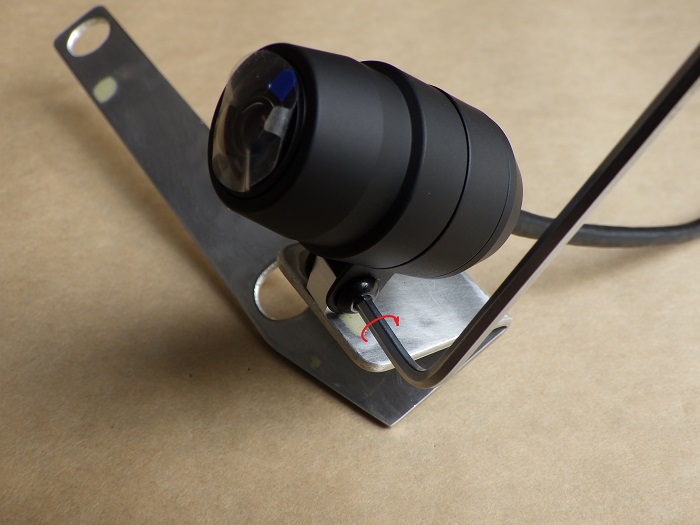
Camera Position Adjustment
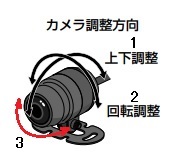
Camera Position Adjustment
From quick manual from Mitsuba EDR-21A
Camera can be adjusted:
- Vertically
- Rotationally
- Horizontally — via STEP 21’s screw
With the bundled mount, horizontal position would’ve been adjusted using double-sided tape.
Once positioned, mark the block with a black marker.
Adhering the Block
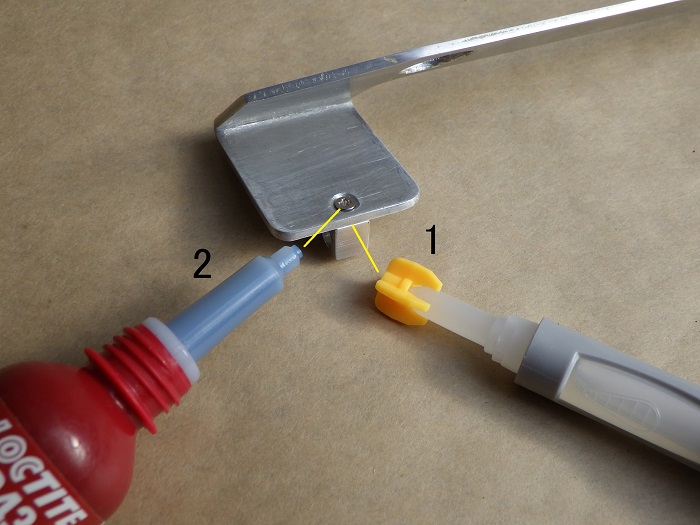
<Adhering the Block>
Secure the block to the bracket at the adjusted angle:
- Apply adhesive
- Add thread locker and tighten screw
Brackets with Attached Block
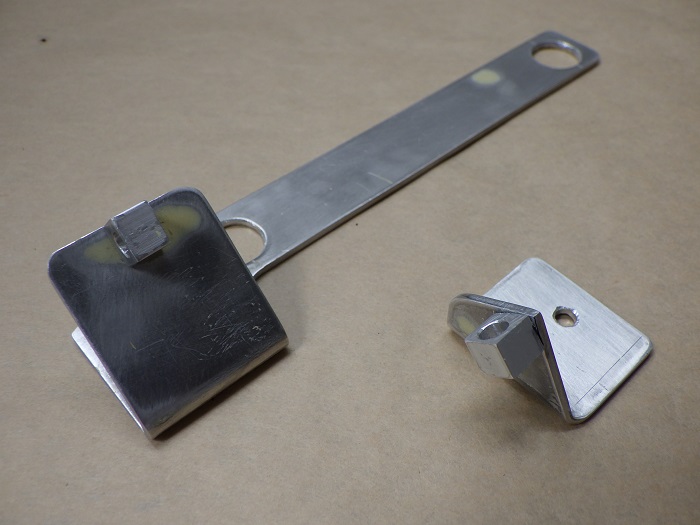
<Brackets with Attached Block>
Now, the bracket is finally coming together.
Painting the Brackets
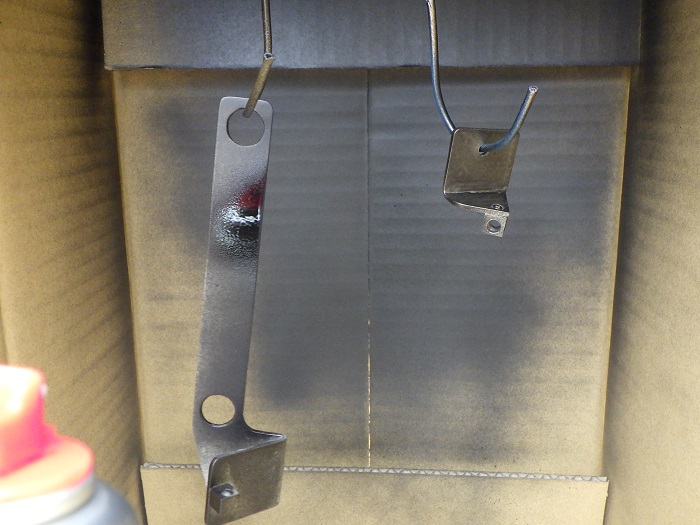
<Painting the Brackets>
Spray-painted for final finish.
Mistake: forgot to move the spray can while painting—resulted in uneven texture.
Used matte black to match the camera color.
Due to use of putty and adhesive, heat curing wasn’t possible.
Repeated paint-dry cycles four times.
Painted Brackets
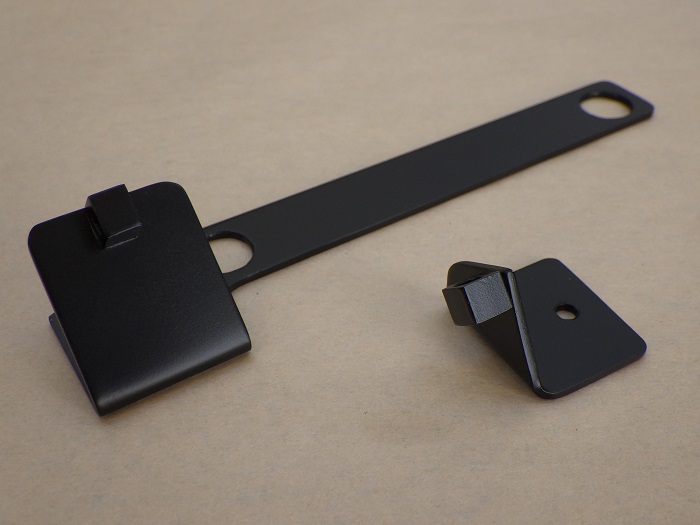
<Front View>
Left: Front bracket
Right: Rear bracket
<Back View>
Left: Front bracket
Right: Rear bracket
Matte black helps conceal any unevenness from the paint job.
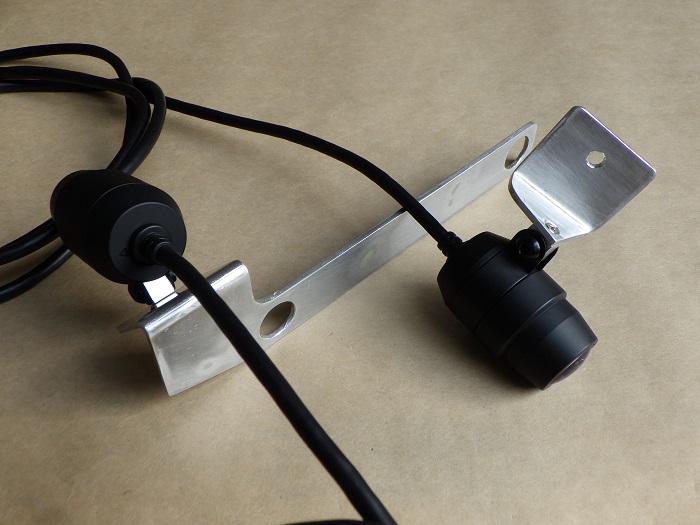
Brackets with Cameras Installed
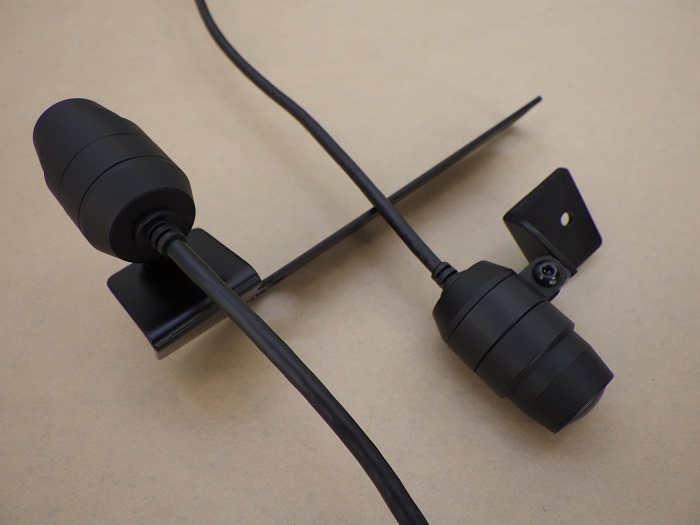
<Brackets with Cameras Installed>
Left: Front
Right: Rear
Simple, clean, and unified — exactly the look I was aiming for.
To be continued in “Motorcycle Dash Cam Installation Part 4 — Crafting the Switch Bracket”.
3. まとめ
This article covered the process of fabricating camera brackets for a dashcam.
In addition to shaping aluminum plates, custom blocks were made from aluminum bars.
Avoided using the generic mount and achieved a simpler, more unified design.
- Used 2mm aluminum for enhanced durability
- Sharp bends achieved with a filed flat bar
- Putty and adhesive ruled out heat-based curing
- Custom blocks made the final look more refined


