
I have been using the rear paddock stand (hereafter described as the rear stand) for many years.
I now use it whenever I wash or do maintenance.
I even feel uncomfortable if the vehicle body is not level.
I remember that when I put the rear stand on, I had fold it down twice, once on each side.
I still remember the crash sound in my ears.
This time, when I bought my YZF-R125, I bought a new rear stand for the first time in 25 years.
I don’t want to fall it down again, so based on past experience I have compiled the following.
- Setting up the rear stand
- How to use the rear stand
- Condition of moto on the rear stand
| Date | 10th April 2021 |
| Subjects | Maintenance, Failure, Repair |
| Shop or DIY | DIY |
| Difficulty | |
| Working hours | 0.5 |
| Costs [Yen] | 17,930 |
1. Goods to use
| No. | Products name | Manufacturer | Products number | Quantity | Amount[Yen] |
| 1 | Long roller stand (L-fixture type) | J-trip | JT-121LWT | 1 | 17,930 |
2. How to use rear stand (STEP 1-14)
Rear stand
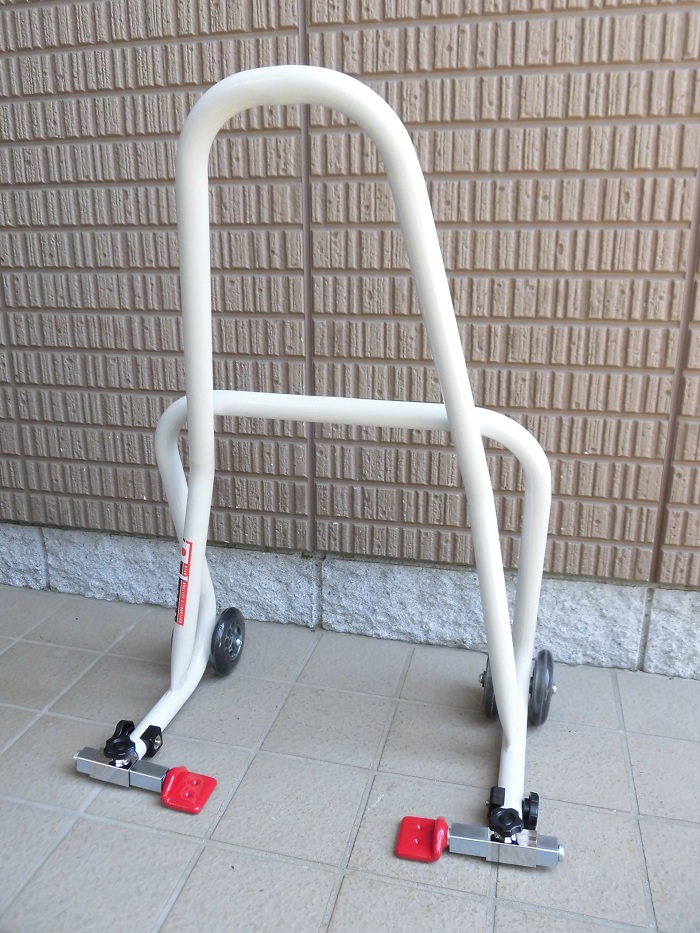
<Rear stand>
The rear stand used is a J-trip long roller stand.
For the fixture, I decided on the versatile L type so that I could use it on other bikes as well.
It is a little big for the YZF-R125, but it is perfect for me as I am not very strong.
As a type of fixture for J-trip rear stand, there are three types.
- L-fixture, which is received on the underside of the swingarm
- V-fixture, which hangs on a hook attached on the swingarm
- The first type, which is fixed to an attachment through the axle shaft.
This time, I selected L-fixture.
The choice of the rear stand depends on the type of car and its use, so I recommend you check the use cases by internet.
Rear stand settings
First, adjust the rear stand to the moto.
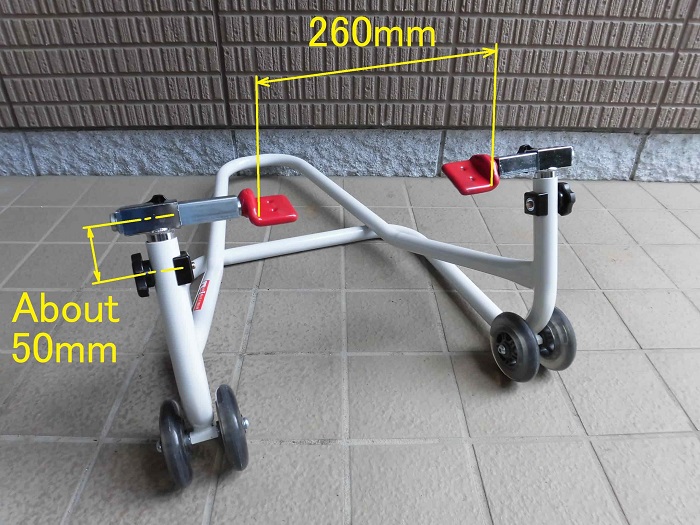
<Rear stand settings>
Width of L-fixtures: 260 mm
Stand height: Lowest point
Please don’t forget below.
- Tighten the knob bolt holding the L-fixtures firmly.
- Make sure that the L-fixtures are the correct width.
This is really important.
I once fold a moto down on another rear stand due to the following mistake.
- The bolt for the fixture was loose, so the fixture moved when I lifted it.
- I lifted the moto while it was wide enough to fit the other moto.
In all of these cases, the swingarm came off from one side of the fixture and fell at once. (Cry…)
Rear stand preparation
Now I hang the stand.
*The following methods differ from those recommended by J-trip
<Rear stand preparation>
Place the rear stand directly behind the rear wheel.
Vehicle alignment
<Vehicle alignment>
With the side stand on, raise the bike from the right side.
Then straighten the handlebars.
Body movement
<Body movement>
Move yourself to near the right rear seat while holding the moto in an upright position.
This is the most dangerous.
Because I’m not used to this, my arms are strong enough to hold the moto down.
(As you get used to it, you will be able to raise the moto at once from the right rear seat position.)
The reason for standing on the right side is to prevent the bike from falling over to the right side.
Even if you lose your balance, if you don’t fall to the right side, you should be able to manage.
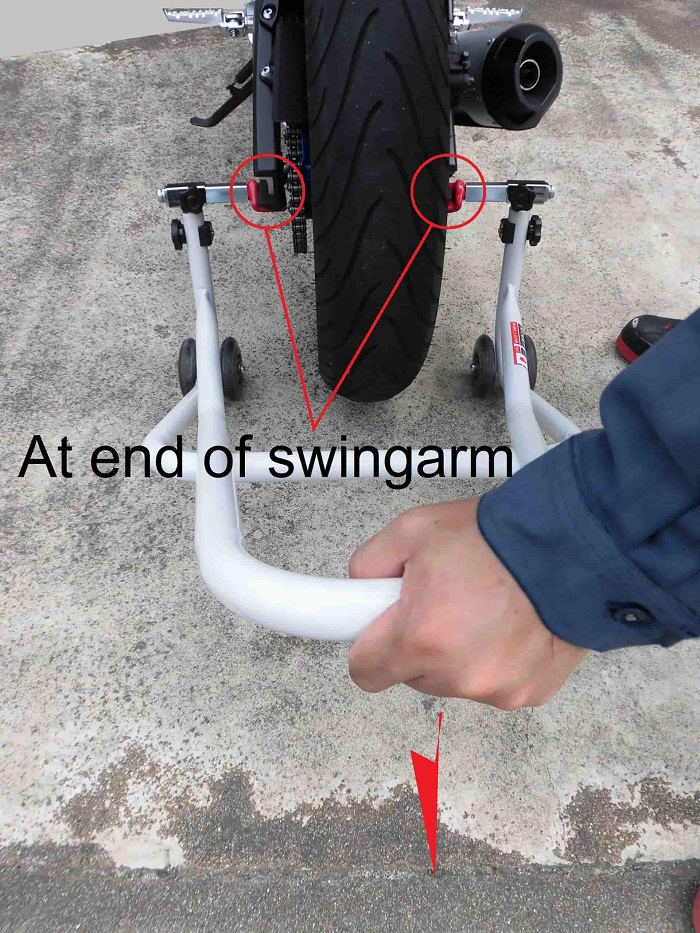
Lift up by rear stand 1
<Lift up by rear stand 1>
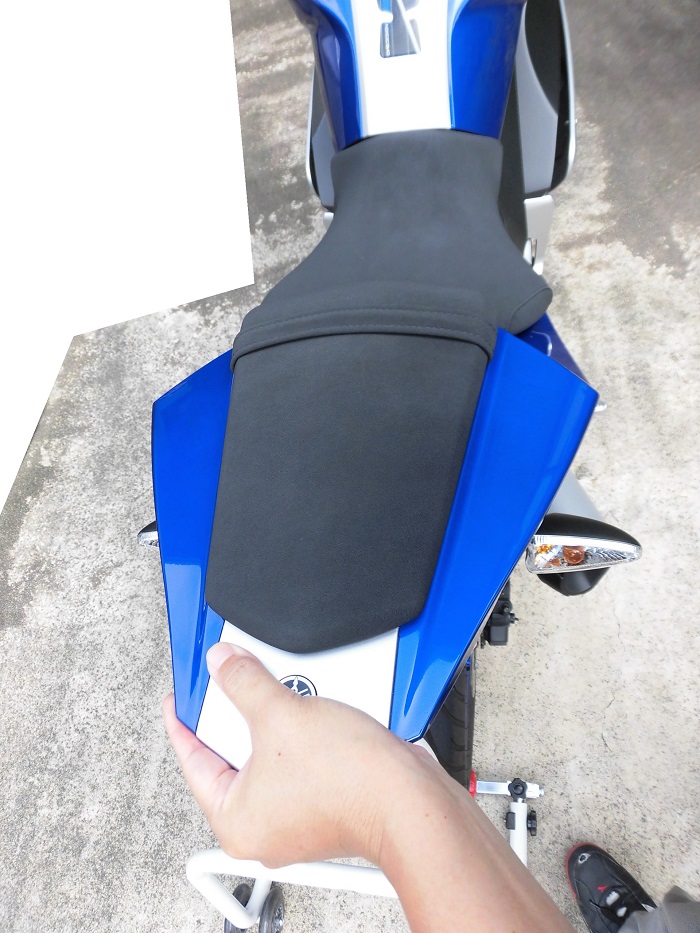
While holding the moto with your right arm and set the rear stand at the rear end of the swingarm with your left hand.
The rear cowl has an edgy design, so it might be easy to grab.
It takes a lot of arm strength to keep the bike straight and both my arms and the moto are unstable.
My sense of balance may be deteriorating?
But don’t be in a hurry and set the L-fixtures evenly at the end of the swingarm.
Lift up by rear stand 2
<Lift up by rear stand 2>
Push down the rear stand with your left hand and lift the swingarm.
Because the stand is long, the moto is lifted with really light force.
Excellent.
After lifting, raise the side stand as far as possible.
The L-fixtures are positioned at the end, so it is possible that moto falls down if it catches your foot.
My legs (shins) hurt, too…
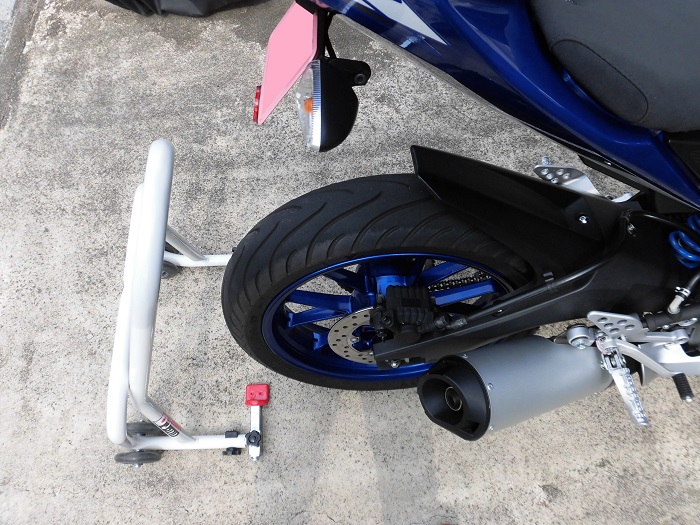
Condition lifted by rear stand 1
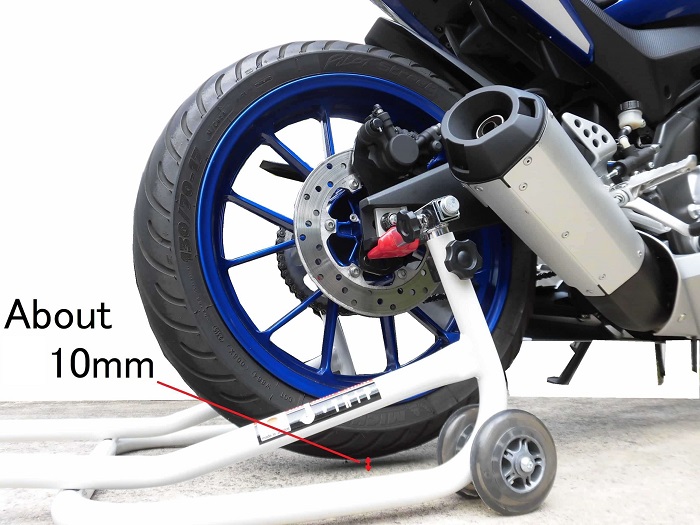
<Condition lifted by rear stand 1>
The L-fixtures hold the bike like this.
The tire lifts off the ground by about 10 mm in this position.
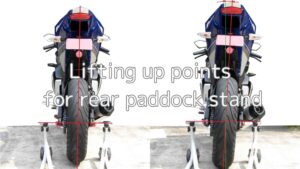
Lifting up position for L-fixtures
The J-trip’s manual says that the position of the stand should be “in front of the axle shaft, but as far as possible to the rear end”, but on the R125 setting the stand in front of the axle shaft causes inconvenience.
For more information, please see the next maintenance record “Lifting up position for rear stand”.
Condition lifted by rear stand 2
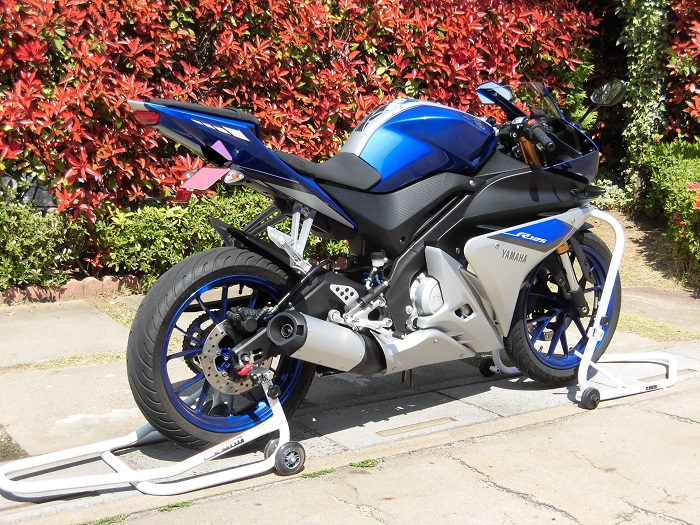
<Condition lifted by rear stand 2>
As a whole, the moto looks like this.
Please ignore the front stand.
I forgot to take an overall photo with just using the rear…
Lowering a side stand
Now, I remove the rear stand.
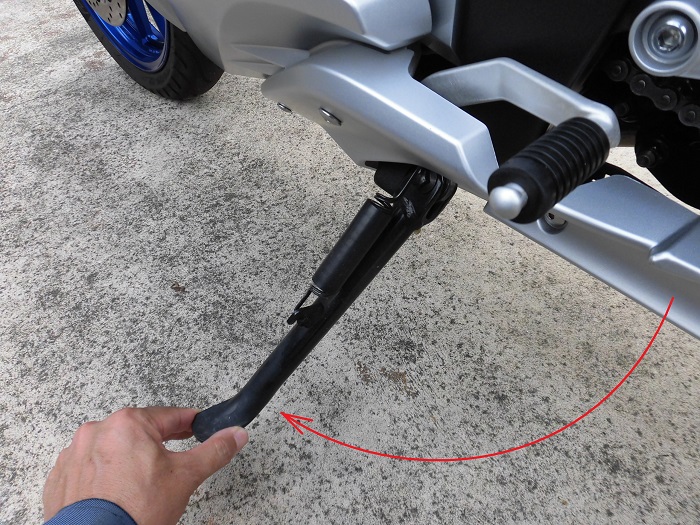
<Lowering a side stand>
First, put the side stand down.
This is also really important.
I once forgot to put the side stand down, and without realizing it, I fell to the left side.
I didn’t realize what had happened and tried my best to support the falling moto…
(Do you normally forget to take it out?).
Lift down by rear stand 1
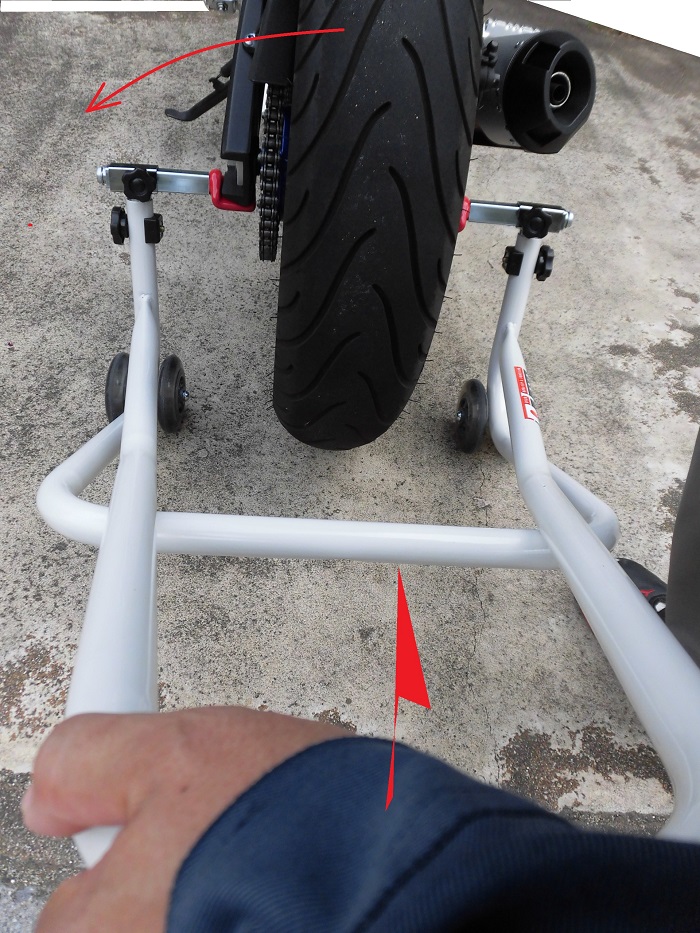
<Lift down by rear stand 1>
Standing near the right rear seat, lift the rear stand with my left hand while supporting the moto with my right arm.
Pull up the rear stand slowly and gently to ground the tire.
Then lean the moto to the left and ground the side stand.
There is less risk of falling down moto when lifting down it?
Lift down by rear stand 2
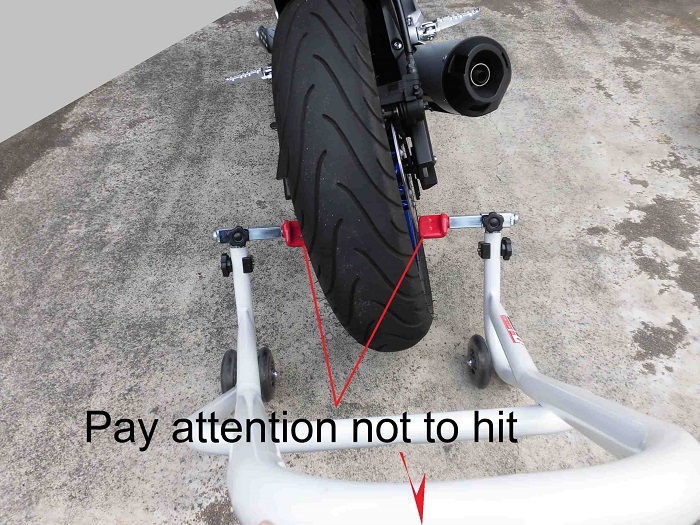
<Lift down by rear stand 2>
Pull out the rear stand, taking care not to hit the wheel with the L-fixtures of the rear stand, etc.
The L-fixtures are covered with a soft material, which is appreciated as it is less likely to scratch the wheel if it hits it.
J-trip’s method Considerations
J-trip’s video shows that when you lift it up by rear stand (roller stand), they seem to be as following.
- Lock the front with the brake lock (to hold the moto in place) and only move the stand.
- Turn the handlebars to the left so that the moto leans towards the side stand as much as possible, to reduce wobble.
I also have a stand without rollers.
When I use that stand, I have to move the moto when lifting it.
So, I don’t have the habit of braking.
Also, if I move the moto with the handlebars turned to the left, the moto is at an angle on the stand.
So, I keep it straight.
Also, when removing the rear stand, they seem to be as following.
- Put your foot at the end of the rear stand, hold the rear stand and move the moto to remove it.
At this time, you need to be careful not to bounce the rear stand and damage the stand or hit the rear wheel.
3. Summary
Everyone has a different way to use the rear stand.
But the important thigs are that you can choose the way that is easiest for you and as long as you don’t fall down the moto.
- Tighten the knob bolts holding the L-fixtures firmly.
- Check that the L-fixtures are the correct width.
- Be careful not to forget to take the side stand out when lifting down it.
→Choose a method that is easy to do, but only if the moto does not fall down.


