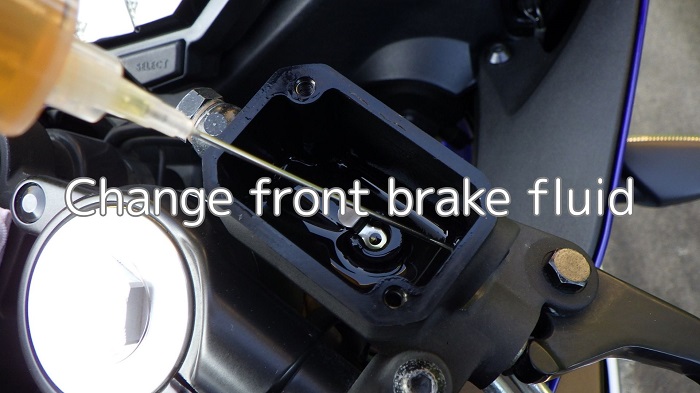
Following the rear, the front brake fluid is replaced.
This will be the first time to replace the fluid as well, two and a half years after the moto was delivered.
There are three main methods of replacing brake fluid as described below, but this time I will summarize the process using a hand-held vacuum pump with the suction type 2.
- The pressure-feeding method…
1) Pressing the brake lever/pedal
2) Push out from the reservoir tank or brake caliper - Suction type…sucked out from the bleeder plug by negative pressure
- Gravity type…method of draining by the fluid’s own weight
From this article, you can learn the following.
- How to change brake fluid in front brake
- How to use a hand-held vacuum pump
| Date | 23rd September 2023 |
| Subjects | Maintenance, Failure, Repair |
| Shop or DIY | DIY |
| Difficulty | |
| Working hours | 1 |
| Costs [Yen] | 0 (Use what I have) |
1. Goods to use
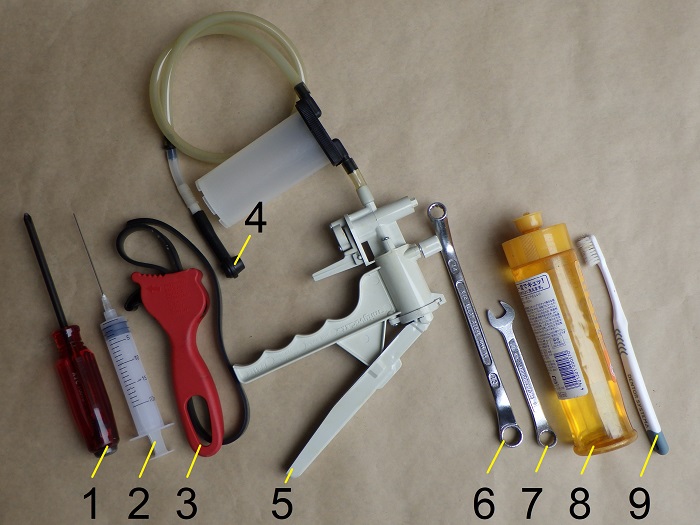
| No. | Products name | Manufacturer | Products number | Quantity | Amounts[Yen] |
| 1 | Resin Pillips screwdriver (No.2) | KTC | PDD1-2 | 1 | 1,606 |
| 2 | Syringe | DAISO | – | 1 | 110 |
| ST12 | Brake fluid (DOT4) | KYK | 58-052 | 1 | 857 |
| 3 | Rubber strap wrench | COMERI | SW-0510 | 1 | 998 |
| 4 | Brake nipple adopter | STRAIGHT | 15-7616 | 1 | 540 |
| 5 | Hand-held vacuum pump (mityvac) | DAYTONA | 24956 | 1 | (9,130) |
| 6 | Box wrench (10mm) | KTC | M25-10X12 | 1 | 2,020 |
| 7 | Combination wrench (10mm) | KTC | MS2-10 | 1 | 1,353 |
| 8 | Dishwashing detergent | – | – | 1 | 109 |
| 9 | Toothbrush | – | – | 1 | 58 |
| 16,781 |
2. Change front brake fluid (STEP1-31)
Brake fluid overflowed…
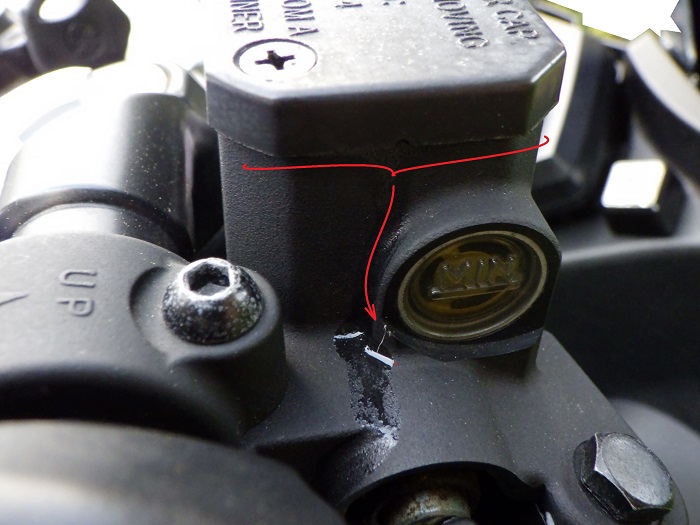
<Overflowed brake fluid>
In the maintenance record “Check and clean front brake2【Installation】”, brake fluid overflowed when the brake piston was pushed back into the brake caliper.
Therefore, I also cleaned the reservoir cap and tank area.
Work procedures
Proceed in the following sequence.
- Change brake fluid in the reservoir tank
- Change fluid in brake hoses and brake calipers
- Clean removed parts
- Put back in reverse order of removal
Reservoir tank position
First, let’s start with the body posture.
The genuine reservoir tank is designed to be level when the moto is on the side stand and the handlebars are turned to the left.
So, if you remove the reservoir tank cap while the vehicle is on the maintenance stand and the handlebars are straight, brake fluid that is up to the upper limit may spill out.
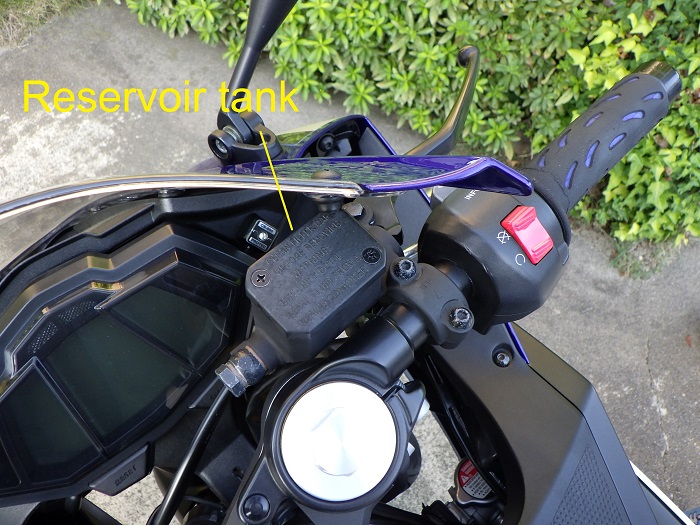
<Reservoir tank position>
So, I begin the work with the side stand on and the handlebars turned down.
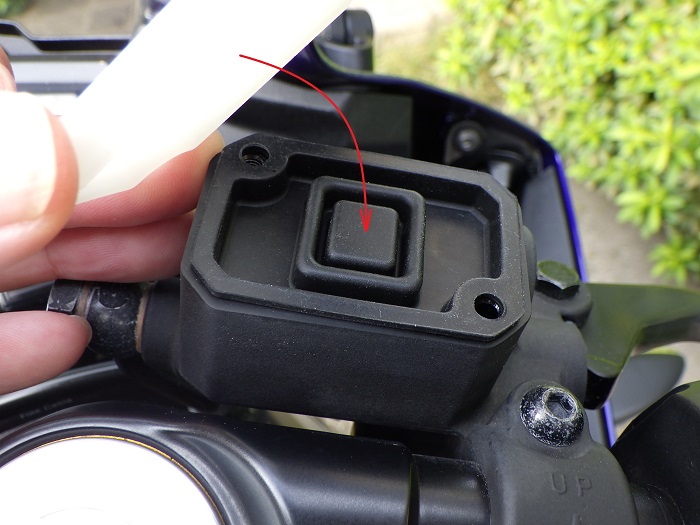
Remove reservoir tank cap 1
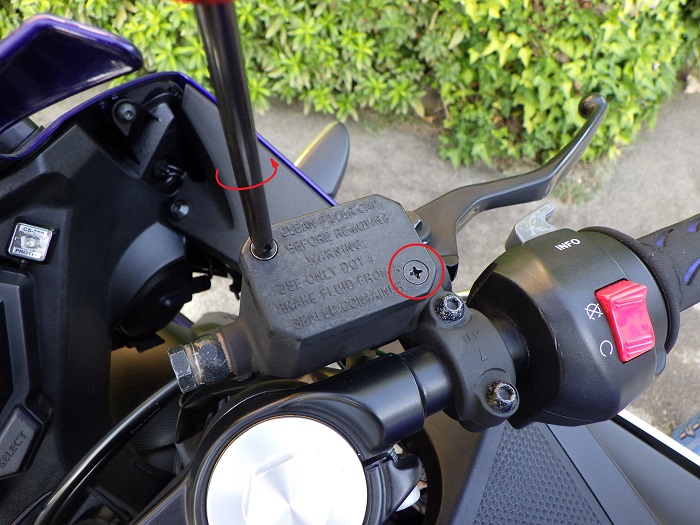
<Remove reservoir tank cap 1>
Using a Phillips screwdriver (No. 2), remove the two screws that hold the cap on the reservoir tank.
As the screwdriver hits the screen, the handle is backed out slightly.
Remove reservoir tank cap 2
<Remove reservoir tank cap 2>
Remove the reservoir tank cap.
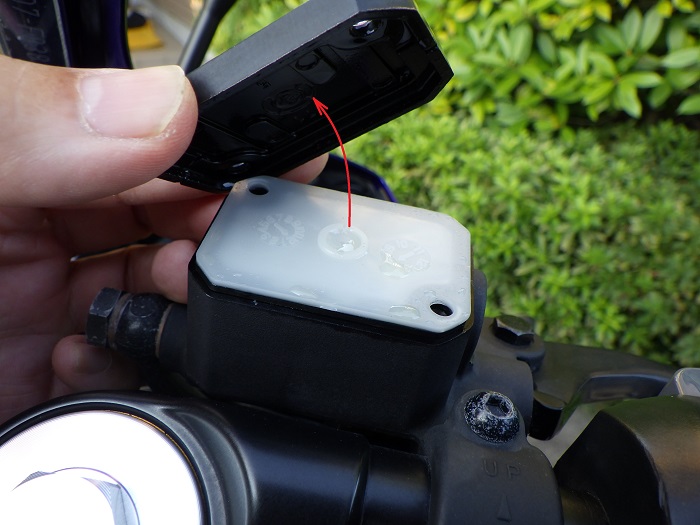
Diaphragm bush
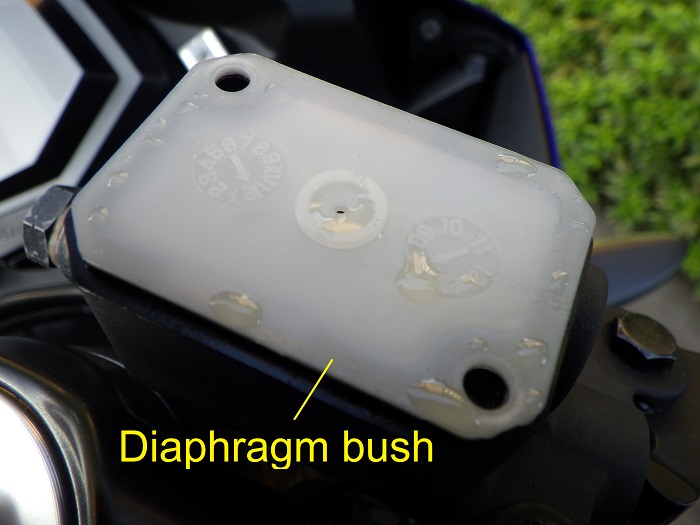
<Diaphragm bush>
The brake fluid is on the diaphragm bushing.
Normally, I don’t think it would get in here, but it must have got in when the brake piston was pushed in.
Remove reservoir diaphragm
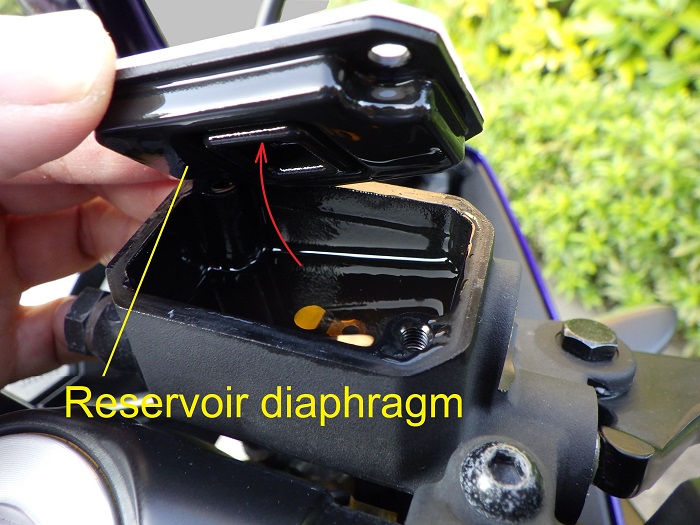
<Remove reservoir diaphragm>
When I tried to remove the bush, the reservoir diaphragm came off with it.
When the handle is almost straight, the surface of the brake fluid in the tank is tilted.
When the handle is level, the fluid seems to slightly touch the surface of the reservoir diaphragm.
If you pour a lot of fluid, the edge of the diaphragm might always be submerged in fluid?
So, be careful not to pour in too much fluid.
Removed parts
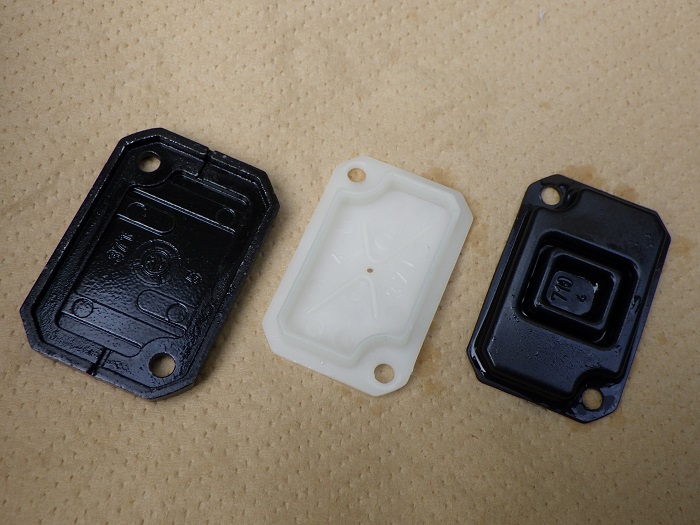
<Removed parts>
From left,
- Reservoir tank cap
- Diaphragm bushing
- Reservoir diaphragm
As with the rear, there were no scratches or cracks on any of the parts.
Suction brake fluid
Now, I will begin to change the brake fluid.
<Suction brake fluid>
First, use a syringe to suck out the brake fluid in the reservoir tank.
If you pour in new fluid when there is a lot of old fluid in the tank, it will get mixed up and you will have to replace a lot of it.
Reservoir tank
<Reservoir tank>
It empties completely like this.
About 20mℓ, I got out.
When I touched the inner wall with a paper towel, I got some pieces of the towel on it…
Comparison of old and new brake fluid
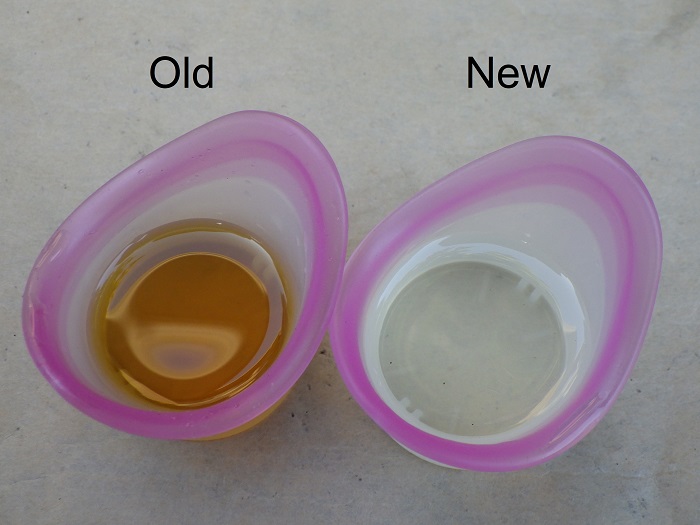
<Comparison of old and new brake fluid>
Left: Drained
Right: In (KYK brake fluid, BF-4)
Like the rear, the front was also discolored.
It may be the light, but it seems browner than the rear.
Brake fluid opening
Once the brake fluid is opened, the cap is too hard to open the next time it is used.
I heard that it is highly hygroscopic, but it may have something to do with this.
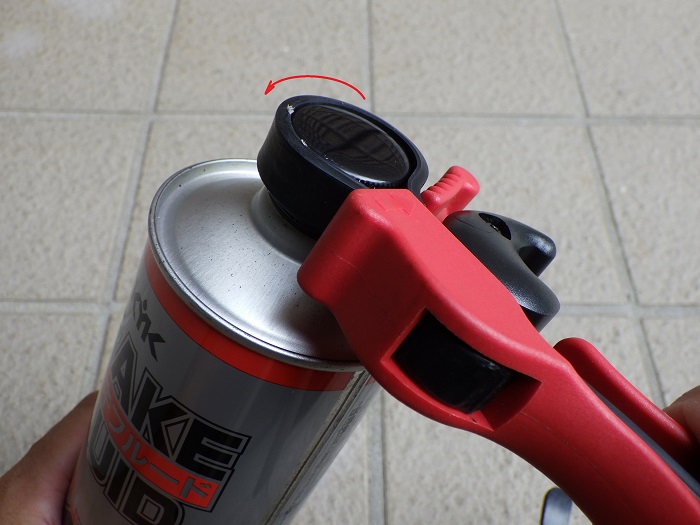
<Brake fluid opening>
Again, it is too hard to open, so I use a rubber strap wrench to open it.
I originally bought this rubber strap wrench to remove the oil filter from my car, but I also use it to open bottle lids in my daily life.
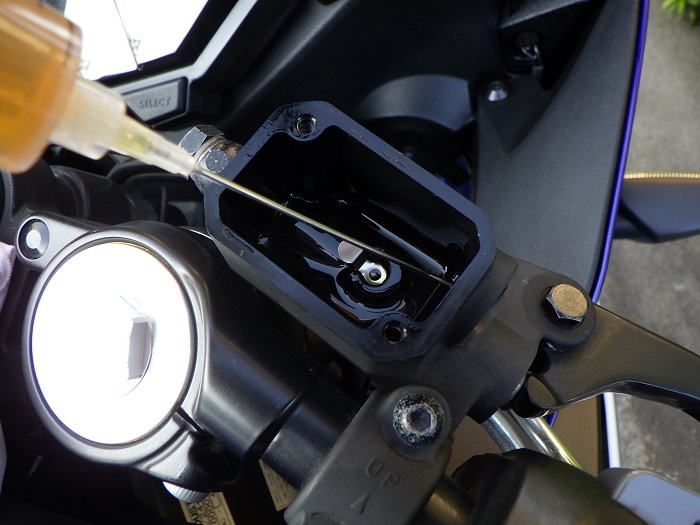
Pour brake fluid
Now, pour brake fluid into the reservoir tank.
<Pour brake fluid>
The area is covered with a cloth to prevent spills from sticking to other parts.
Be careful not to bite air bubbles when pouring.
Pouring is done in large quantities because the fluid in the master cylinder, hose, and brake caliper is drained out.
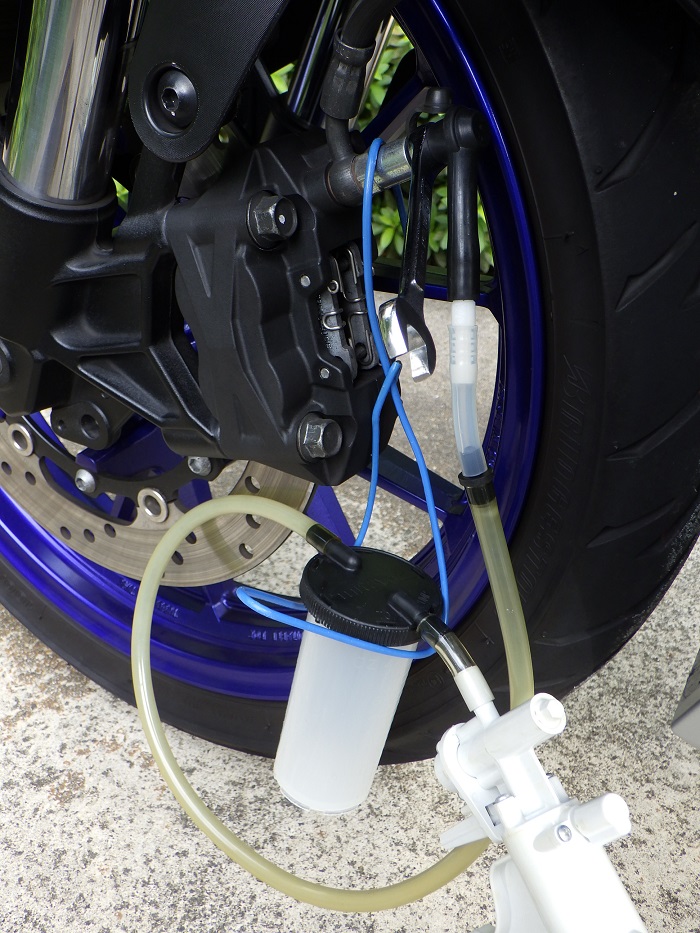
Hand-held vacuum pump
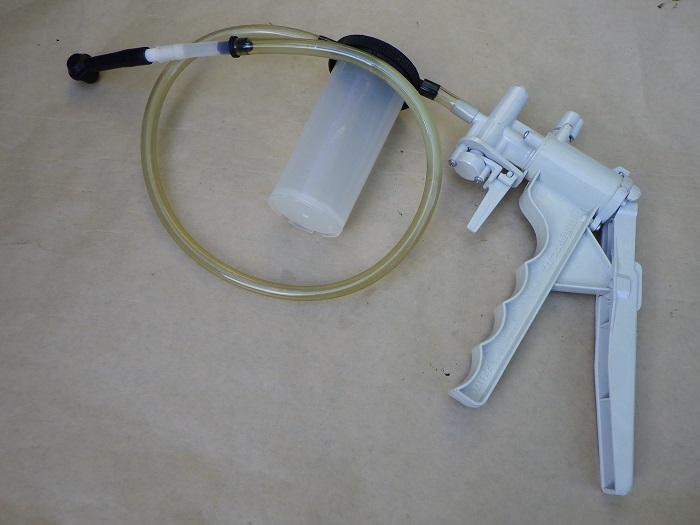
<Hand-held vacuum pump>
A hand-held vacuum pump, shown in the photo, is used to suction the brake fluid.
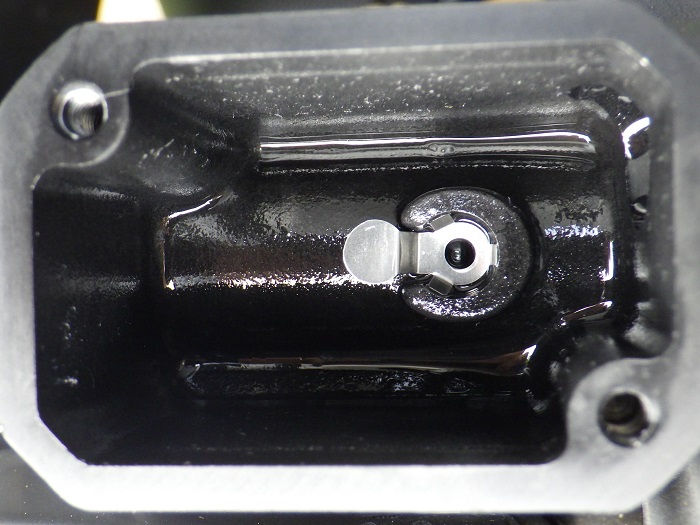
Preparation for brake fluid change 1
Now, I’m ready to change the brake fluid.
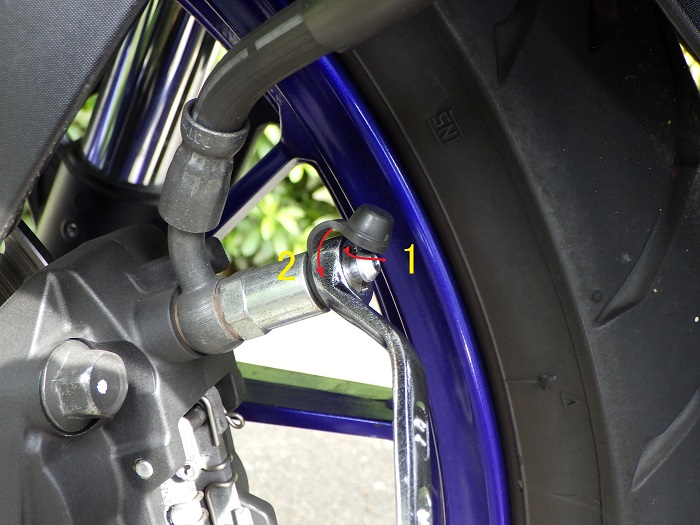
<Preparation for brake fluid change 1>
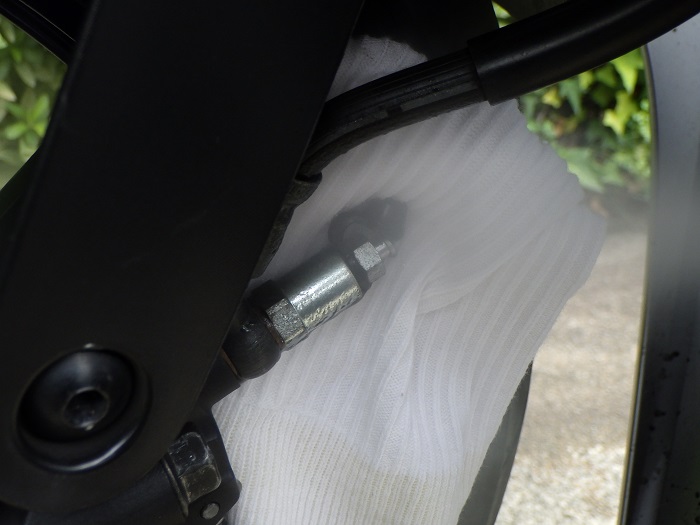
- Remove the bleeder cap.
- Using a box wrench (10mm), gently loosen the bleeder plug.
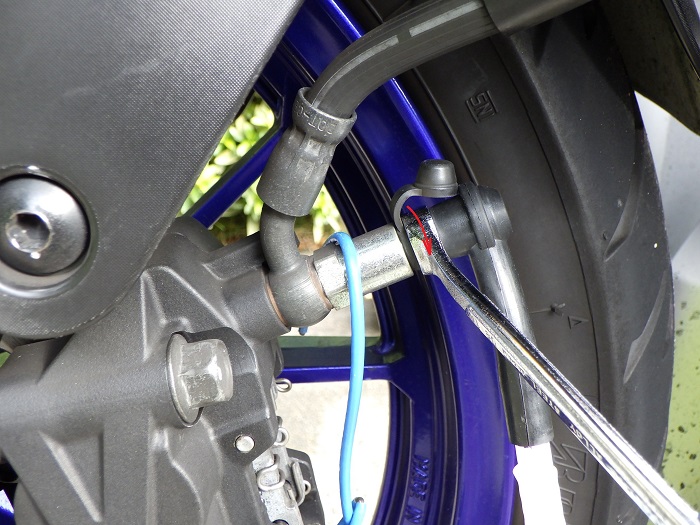
Preparation for brake fluid change 2
<Preparation for brake fluid change 2>
- Through the combination spanner (10mm).
- Attach the nipple adapter to the bleeder plug.
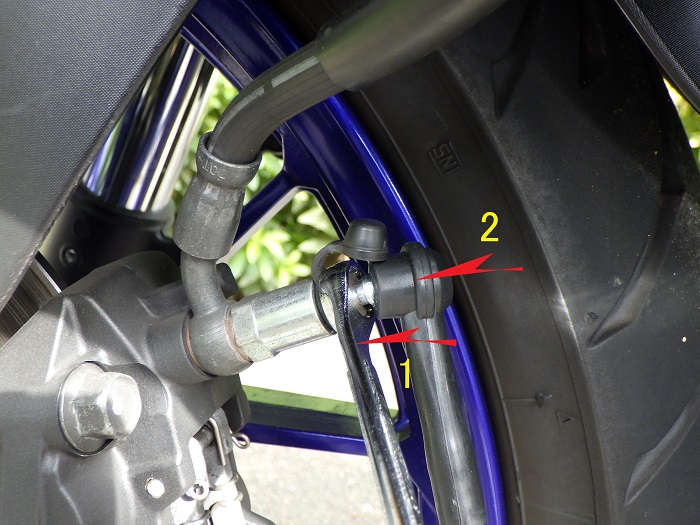
Condition of vacuum pump connected
<Condition of vacuum pump connected>
Connect the vacuum pump like this.
Since the tank is not sitting well, hook it up to a holder made from a hanger.
Change brake fluid 1
Now, change the brake fluid in the brake hose and brake caliper.
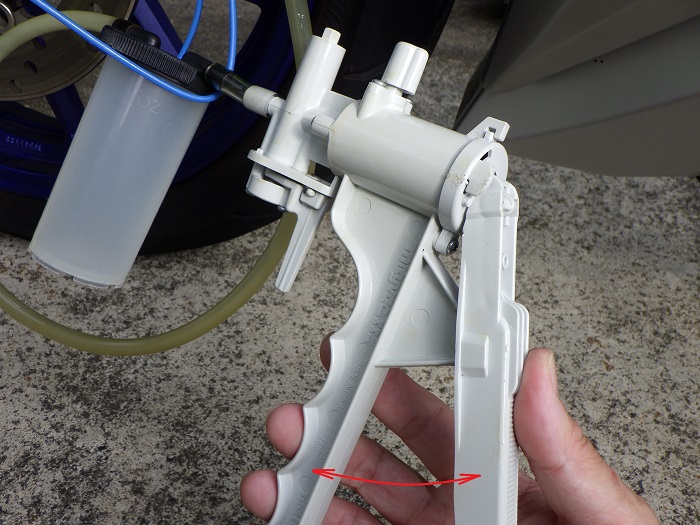
<Change brake fluid 1>
Pump the vacuum pump to generate negative pressure.
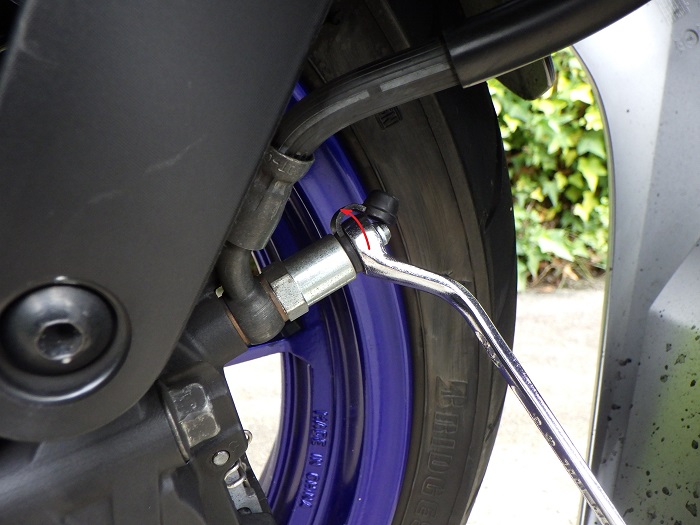
Change brake fluid 2
<Change brake fluid 2>
Loosen the bleeder plug with the combination spanner.
This will drain the brake fluid.
Drained brake fluid 1
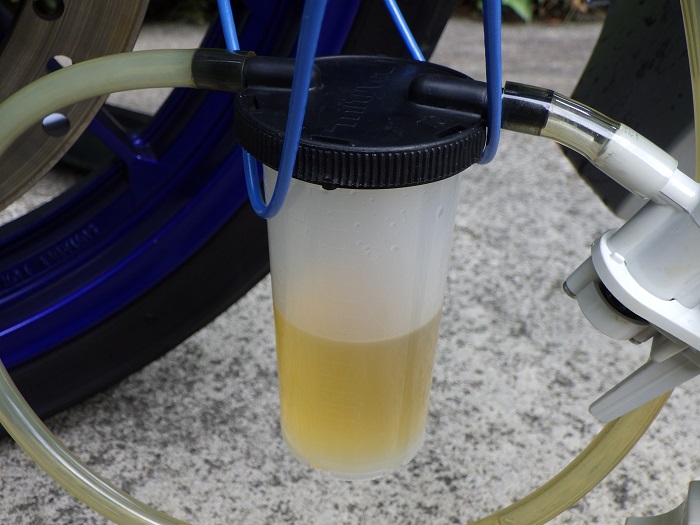
<Drained brake fluid 1>
After a while, brake fluid accumulates in the tank.
At this point, I drained about 70 ml.
Drained brake fluid 2
I am ashamed to say that even though I failed on the rear, I did it on the front as well.
The brake fluid in the reservoir tank ran out very quickly and sucked air with a “cue” sound…
(and three times!).
Let’s just say I’m a little tired.
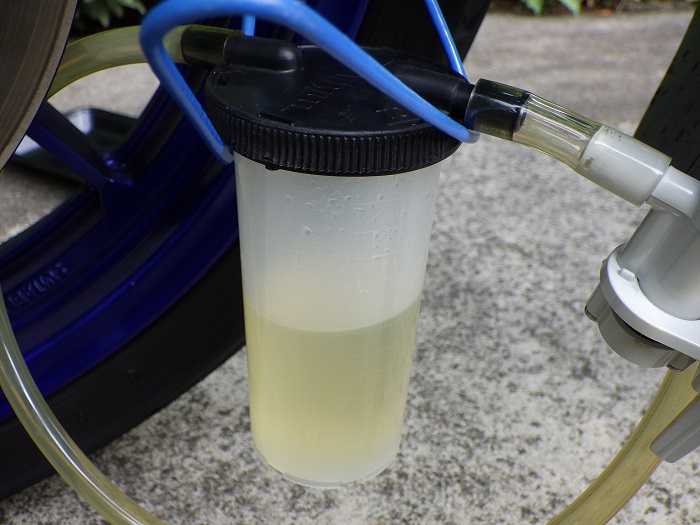
<Drained brake fluid 2>
In the end, I had to drain about 70ml more.
Compared to the photo of STEP 20, it is almost new fluid… what a waste…
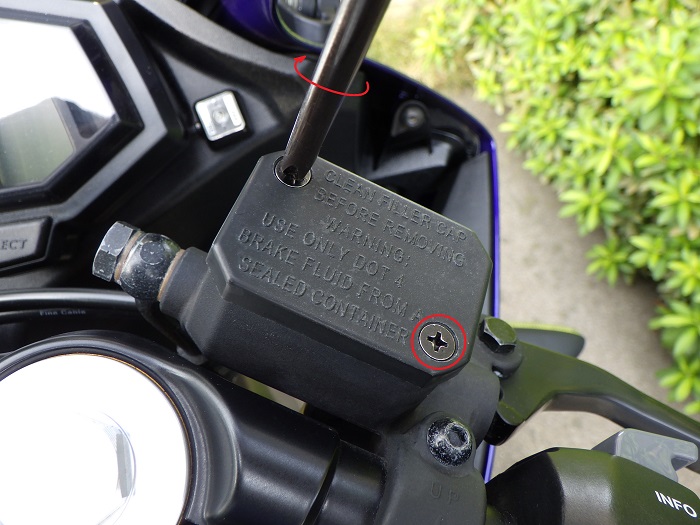
Tighten bleeder plug
<Tighten bleeder plug>
After replacing the brake fluid, tighten the bleeder plug.
The tightening torque is specified as 6 N-m, but I always tighten it by hand.
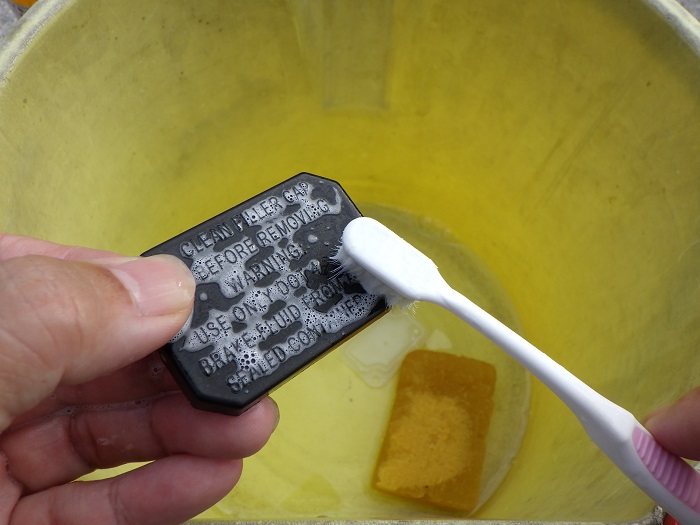
Clean bleeder plug
<Clean bleeder plug>
Wipe off brake fluid on the bleeder plug and clean with parts cleaner.
Wash parts 1
Next, wash the removed parts.
<Wash parts 1>
Use dishwashing detergent to wash away adhered brake fluid and dirt.
Wash parts 2
Then, wipe off the moisture with a microfiber cloth and dry well.
<Wash parts 2>
The reservoir diaphragm should be stretched over the folds and thoroughly wiped dry.
Clean around the reservoir tank
<Clean around the reservoir tank>
With a paper towel, carefully wipe off the brake fluid on the rim of the reservoir tank.
As I wrote in STEP 1, there was quite a bit of brake fluid on it since it had overflowed once.
But still, the scum from the paper towel is a bit of a concern…
Brake fluid level
This time, with the rear stand on and the handlebars straight, I poured brake fluid.
<Brake fluid level>
I poured up to the upper edge of the brake fluid inspection window.
With the side stand on, turn the steering wheel to the left, what level would you get?
The result is shown in STEP 31.
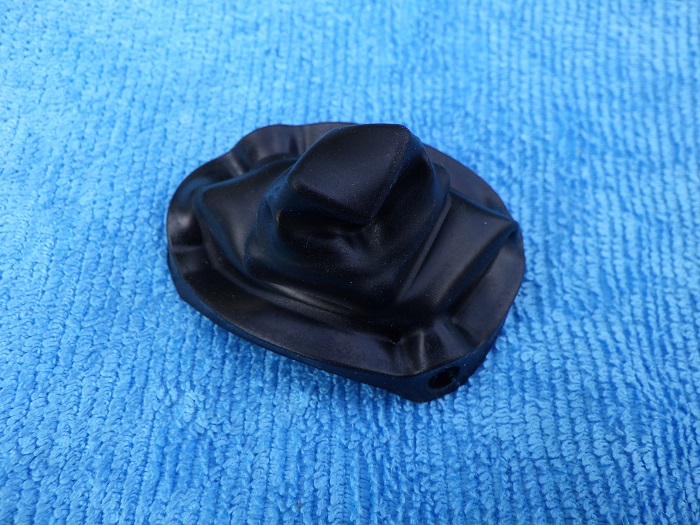
Install diaphragm and other
<Install diaphragm and other>
Install the reservoir diaphragm and diaphragm bushing in this order.
Install reservoir tank cap and other
<Install reservoir tank cap and other>
Using a Phillips screwdriver (No. 2), tighten the two screws that hold the reservoir tank cap.
Gradually retighten the screws alternately so that the reservoir diaphragm is crushed evenly.
This completes the work.
Reservoir tank
Now let’s look at the brake fluid level.
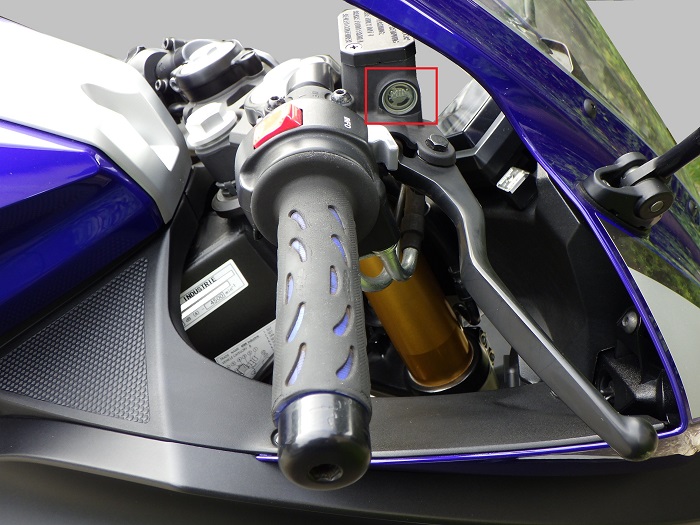
<Reservoir tank>
With the side stand on, turn the handlebars to the left and look at the bike from the side, and you will see this positioning.
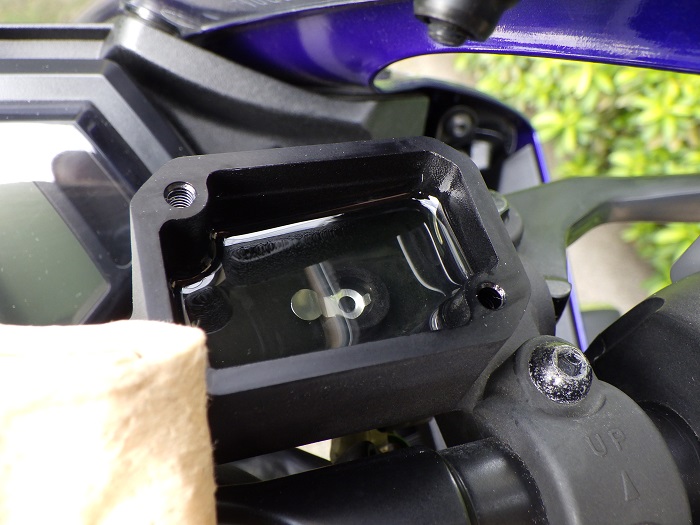
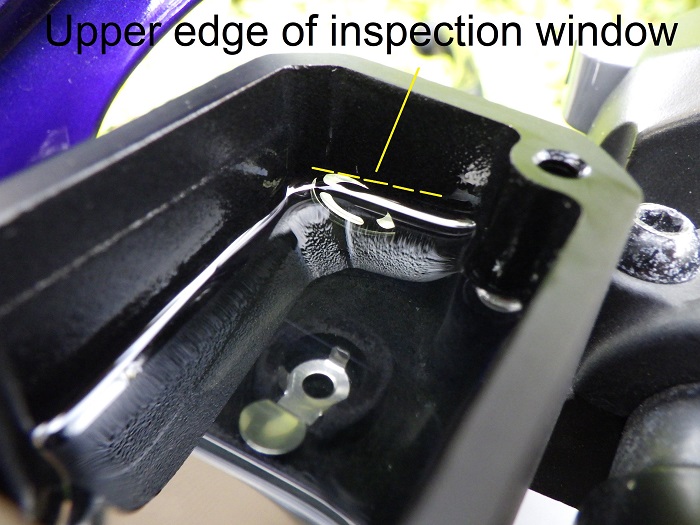
Brake fluid inspection window
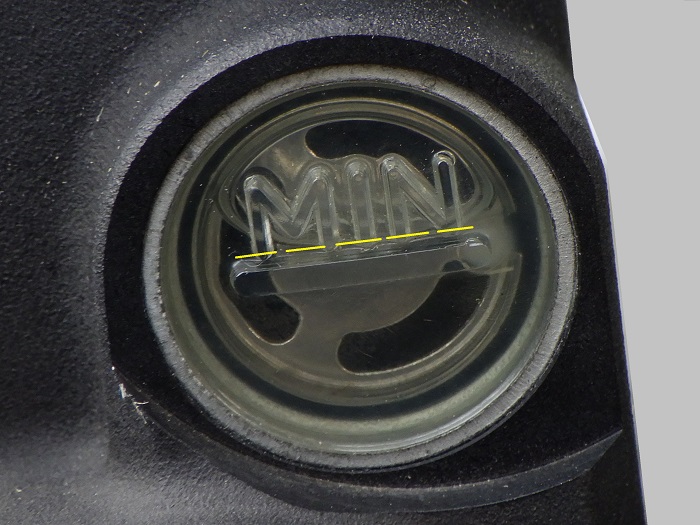
<Brake fluid inspection window>
This is an enlargement of the red frame in STEP 30.
The brake fluid level is now a little above the MIN (lower limit).
I need to add a little more brake fluid.
Now that I have a rough guide for pouring brake fluid, I will pour a little more next time.
3. Summary
Here is a summary of how to change the brake fluid in the front brake.
This time, I used a hand-held vacuum pump. But unintentionally ran out of fluid in the reservoir tank and sucked air.
The fluid capacity of the R125 was lower than I expected, so moving the lever to pump (replace) the fluid may not take that long.
I will try this next time I change it.
- Fluid in the reservoir tank is also sucked out with a syringe.
- Cover any fluid spills with a cloth to prevent them from getting on other parts of the moto.
- When refilling the reservoir tank with fluid, be careful not to bite air bubbles.
- Be careful not to run out of fluid in the reservoir tank.
(If you use a vacuum pump, the fluid in the tank will run out very quickly.) - When brake pads are worn out, only add fluid to the middle of the brake pads.


