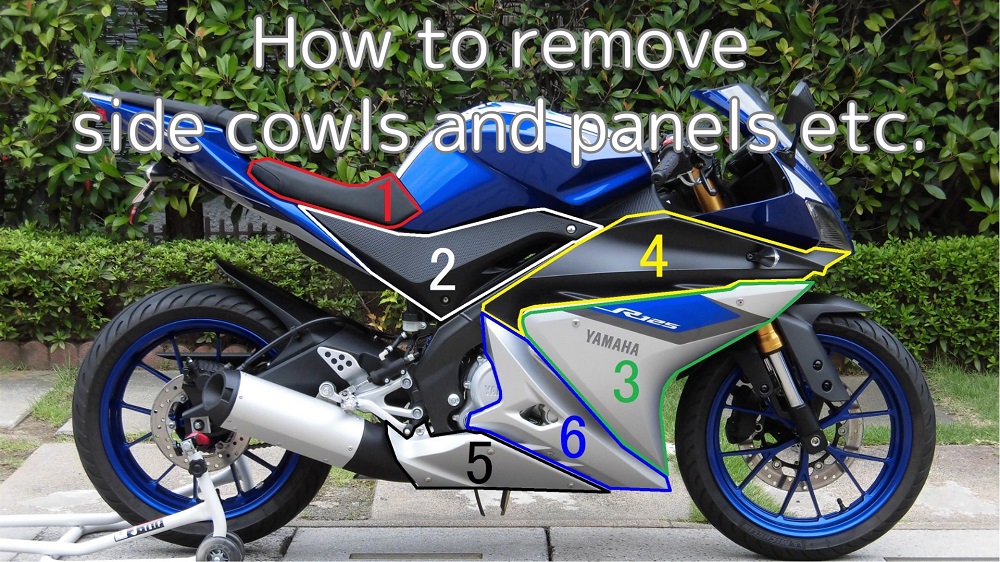
The number of cowls and panels on the YZF-R125 (5D7W)- five on each side and ten on the left and right sides – is outstandingly large compared to other motos.
(Not including the front and rear cowls and front and rear panels.)
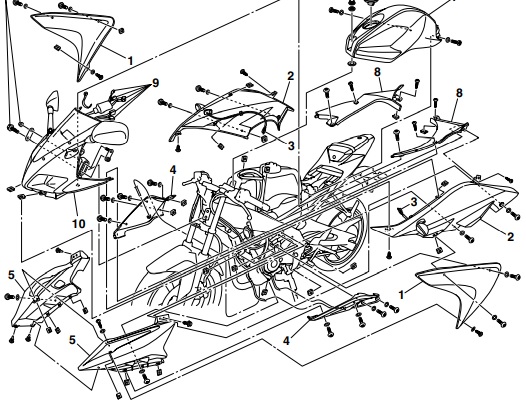
<Cowl – Panel’s drawing>
From R125.com
It looks cool, but it is not supposed to be easy to maintain and are a pain to remove.
Many people who do the work themselves think it is a hassle to remove.
Nevertheless, it is an unavoidable task, as various types of maintenance cannot be carried out without removing it.
I have gone through several operations to remove and install it and have summarized the methods and things I noticed.
From this article you will know as following.
- How to remove side cowls, panels, etc.
- How to avoid damaging removed side cowls, panels, etc.
- How to avoid losing removed bolts etc.
- How to remove and attach push rivets
| Date | 3rd May 2021 |
| Subjects | Maintenance, Failure, Repair |
| Shop or DIY | DIY |
| Difficulty | |
| Working hours | 0.5 |
| Costs | 3,555 Yen |
1. Goods to use
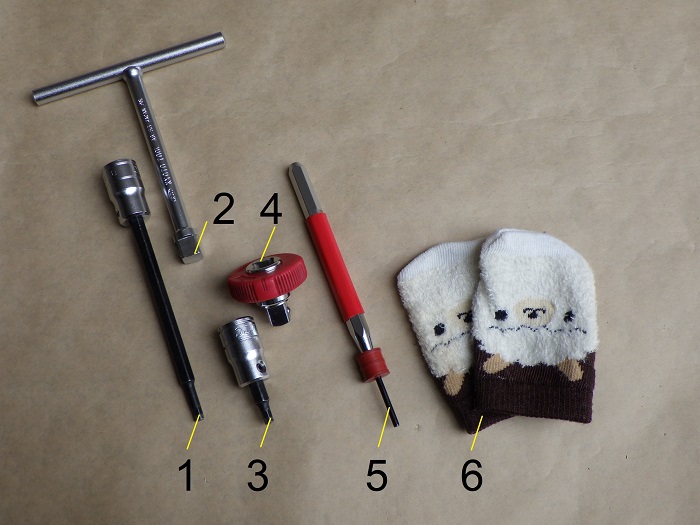
| No. | Name | Manufacturer | Parts number | Quantity | Amounts [Yen] | Purchasing this time |
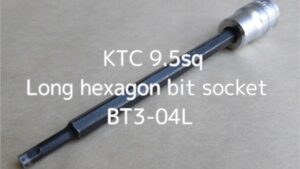
| 1 | Long hexagon bit socket (4mm) | KTC | BT3-04L | 1 | 842 | ○ |
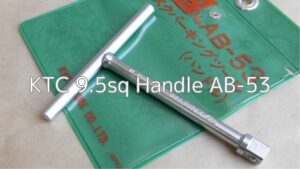
| 2 | Handle | KTC | AB-53 | 1 | 1,430 | ○ |
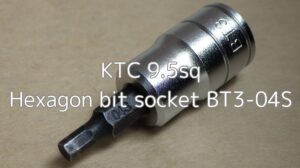
| 3 | Hexagon bit socket (4mm) | KTC | BT3-04S | 1 | 1,012 | |
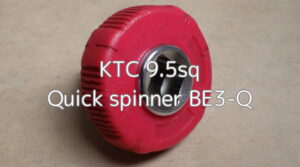
| 4 | Quick spinner | KTC | BE3-Q | 1 | 2,046 | |
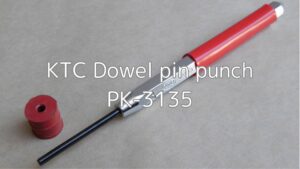
| 5 | Dowel pin punch | KTC | PK-3135 | 1 | 1,173 | ○ |
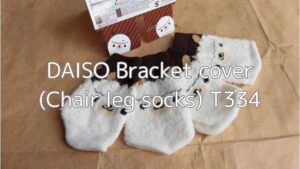
| 6 | Cover (Chair legs) | DAISO | – | 1 set | 110 | ○ |
| 7,256 | 4,198 |
*A moto-mounted tool such as a hexagonal wrench and a pin punch substitute (e.g. a twig) are sufficient to carry out this work.
2. How to remove side cowls, panels, etc. (STEP 1-28)
Removal and installation sequence
Before starting work, the removal and installation sequence is described.
I always remove them in the following and install them roughly in reverse sequence.
The owner’s manual also describes the removal procedure, but that procedure makes it a bit difficult to remove…

<Right side>
- Seat
- Side panel
- Side cover
- Upper side cowl
- Bottom cowl
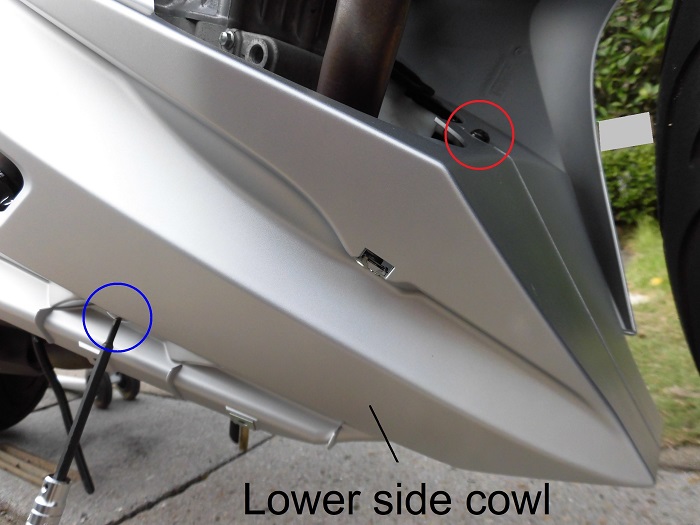
- Lower side cowl
The sequence in which they are removed is a matter of personal preference, but there is no right answer.
Finding the easiest way to do it is also a pleasure!
Remove seat
Now let’s start the work.
If not stated otherwise, the following work will be carried out on the right-hand side.
First, remove the seat.
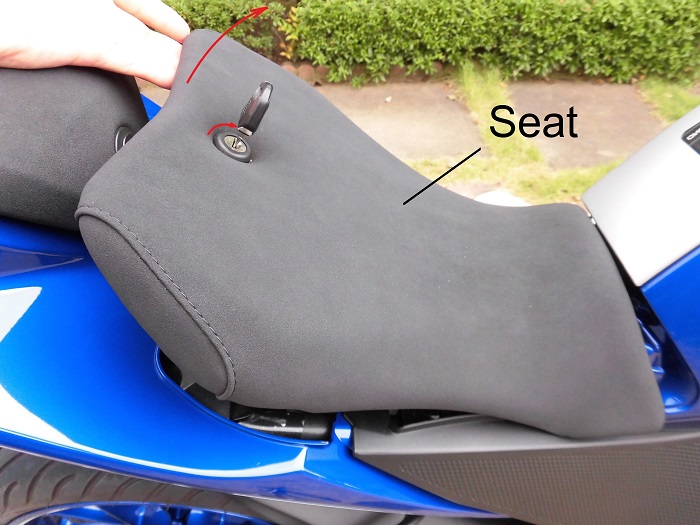
<Remove seat>
Insert the key, turn 90° clockwise and lift.
Remove side panel
Next, remove the side panel.
The side panel is held in place by three bolts.
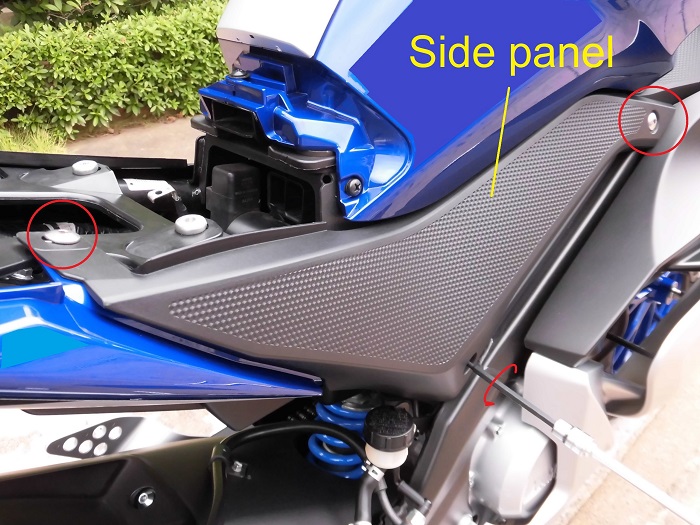
<Remove side panel>
Using a T-bar handle with a hexagon socket (4 mm), remove the bolt under the seat and the two side bolts.
Then pull the side panel forward and remove it.
Bolt collar
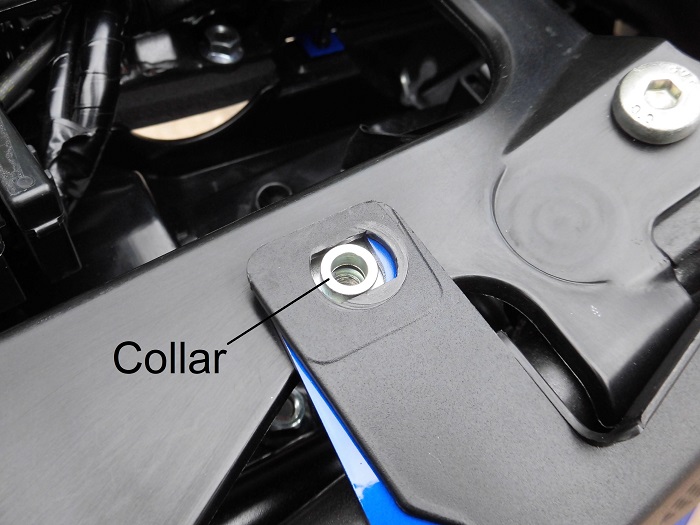
<Collar>
For the bolts under the seat and in the middle, a collar is provided.
The collar under the seat always comes off, but the middle one remains on the side panel, so be careful not to lose it.
Incidentally, the middle collar on the left side of my bike comes off.
Remove side cover 1
Next, remove the side cover.
The side cover is held in place by a tapping screw and two bolts.
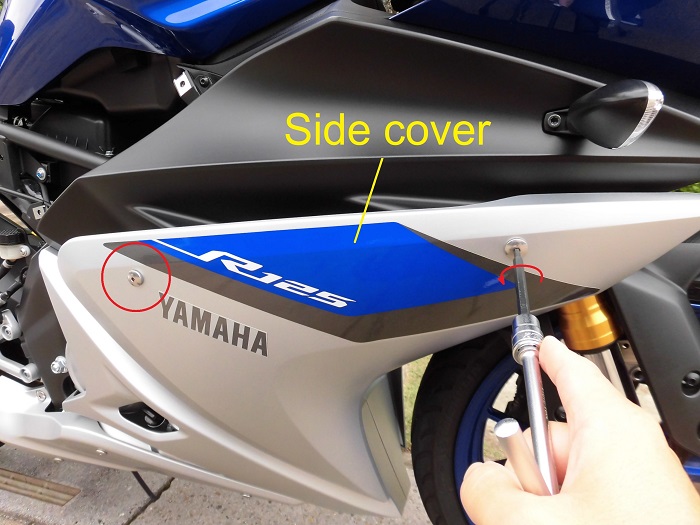
<Remove side cover 1>
Using a T-bar handle with a hexagon socket (4 mm), loosen the two side bolts.
Do not remove at this point.
Remove side cover 2

<Remove side cover 2>
Remove the lower tapping screw with a T-bar handle with a hexagon socket (4 mm).
A long hexagon socket was prepared, as a normal socket would easily hit the lower side cowl.
After that, remove the two side bolts and remove the side cover.
Be careful not to drop it, as it is thin and somewhat difficult to grasp.
Cover bracket
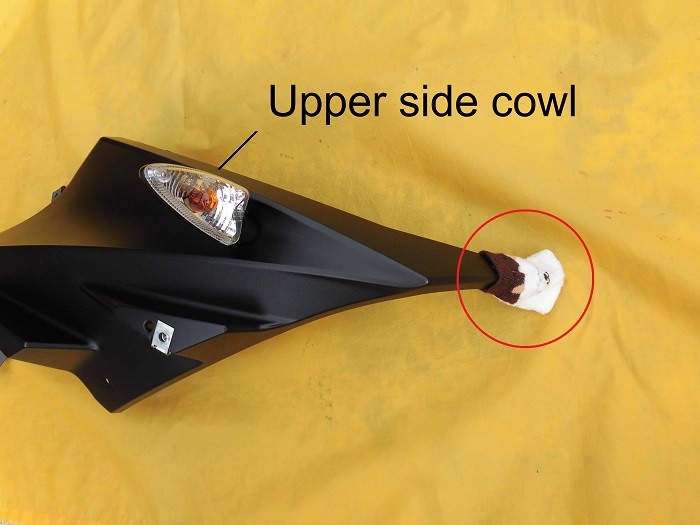
Next, remove the upper side cowl.
The upper side cowl is held in place by three tapping screws on the upper side and two bolts on the lower side, to which the blinker wires are connected.
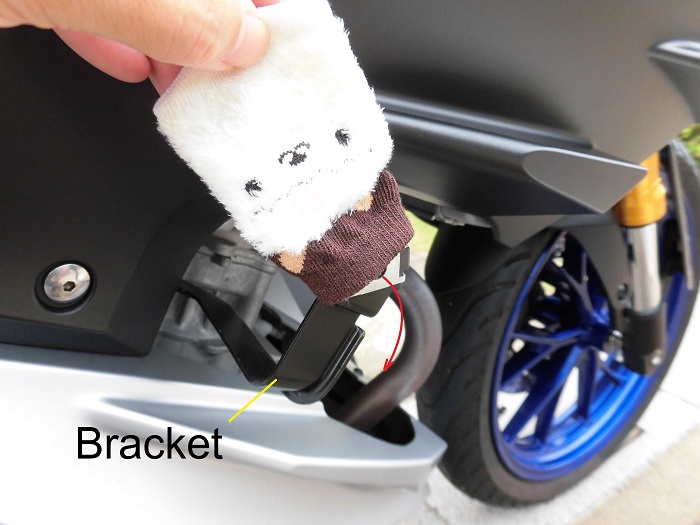
<Cover bracket>
Cover the side cover brackets with a cover (chair foot) purchased from a 100 yen store.
Prevents bumping and scratching when the upper side cowl is removed.
Remove upper side cowl 1
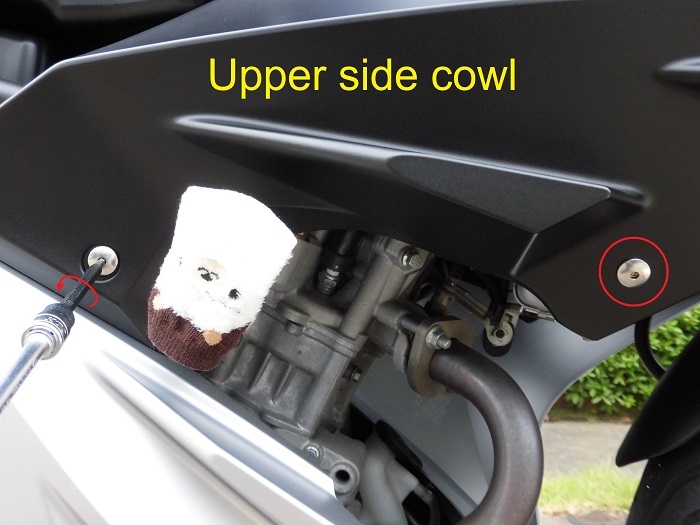
<Remove upper side cowl 1>
Loosen the two side bolts with a T-bar handle fitted with a hexagon socket (4 mm).
Do not remove at this point.
Remove upper side cowl 2
<Remove upper side cowl 2>
Remove the two tapping screws that are co-locked to the front panel.
○: With a T-bar handle with a hexagon socket (4 mm)
○: With a quick spinner fitted with a hexagon socket (4 mm)
Remove upper side cowl 3
<Remove upper side cowl 3>
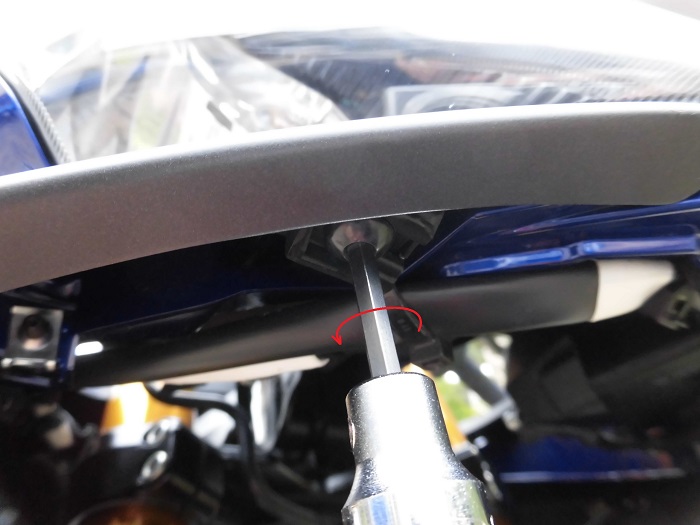
With a quick spinner fitted with a hexagon socket (4 mm), remove the tapping screw at the end of the front cowl.
Afterwards, remove the two side bolts with a T-bar handle with a hexagon socket (4 mm).
Removed tapping screws
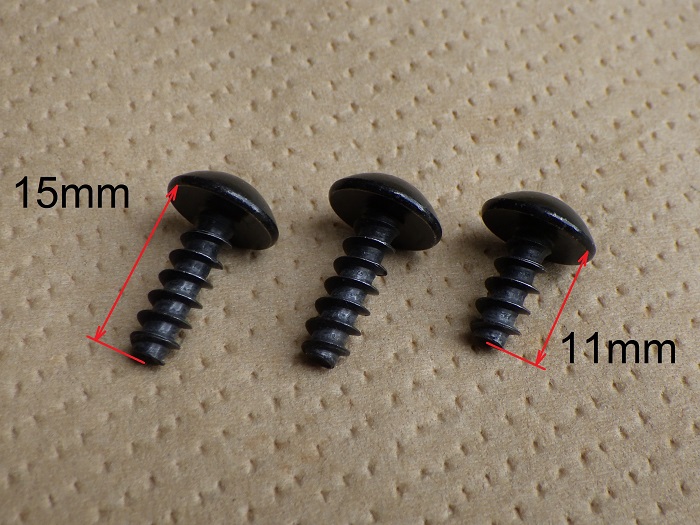
<Removed tapping screws>
Left: STEP 9 ○ section
Middle: STEP 9 ○ section
Right: STEP 10 Front cowl at the end
Note that the tapping screw is only short in STEP 10.
Remove upper side cowl 4
<Remove upper side cowl 4>
Push the upper side cowl forward and then pull it out to the front to remove it.
The notches in the upper side cowl are inserted into the holes in the front cowl.
(For details, see the maintenance record “How to install side cowls, panels etc.” STEP 13.)

Disconnect blinker connector
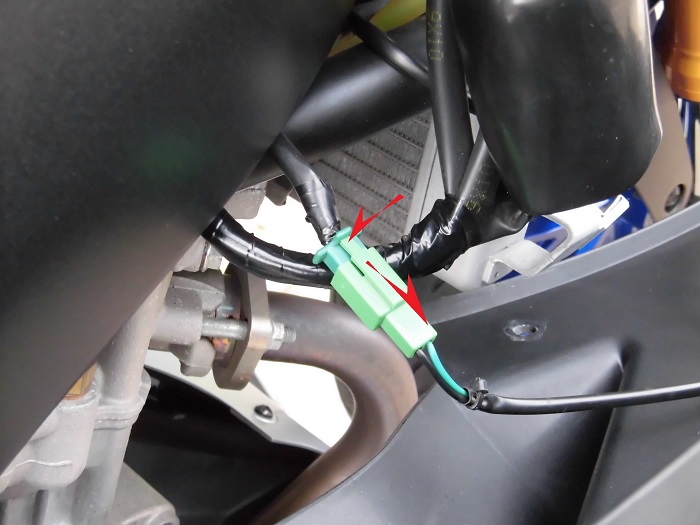
<Disconnect blinker connector>
Then disconnect the wiring connector for the blinker.
Pull while pressing down on the claw part.
The upper side cowl can now be removed.
Note that the color of the connector differs from left to right.
Right side: green
Left side: black
Curing upper side cowl
<Curing upper side cowl>
The tip of the removed upper cowl hits the ground and should be covered to prevent scratching.
The chair legs come in sets of four, so that should be enough.
I’m sure I’ll be taking them off a lot in the future, so I’ll take care of these things to prevent the moto from getting scratched as much as possible.
Now remove the left-hand panel, cover and cowl in the same way, if necessary.
Remove bottom cowl 1
Next, remove the bottom cowl.
The bottom cowl is held in place by four bolts.
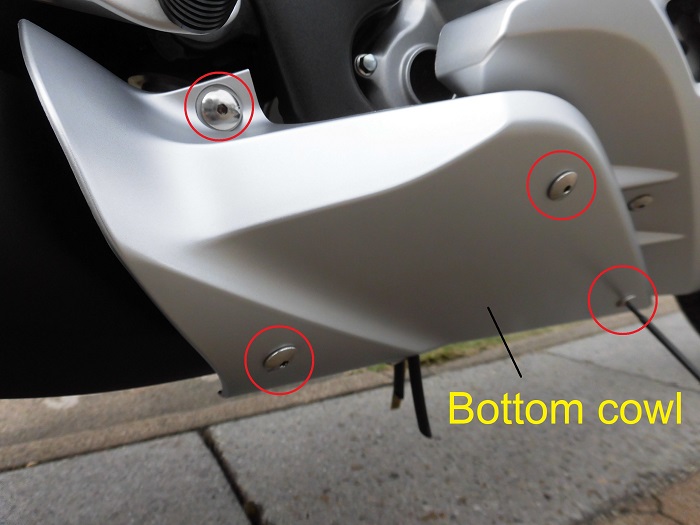
<Remove bottom cowl 1>
Remove the four side bolts with a T-bar handle fitted with a hexagon socket (4 mm).
Remove bottom cowl 2
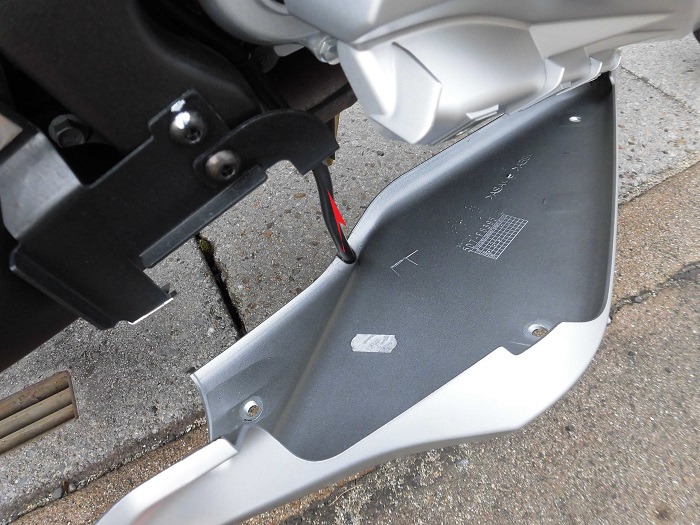
<Remove bottom cowl 2>
Unplug the hose that runs through the cowl.
The bottom cowl can now be removed.
Remove bottom cowl 3
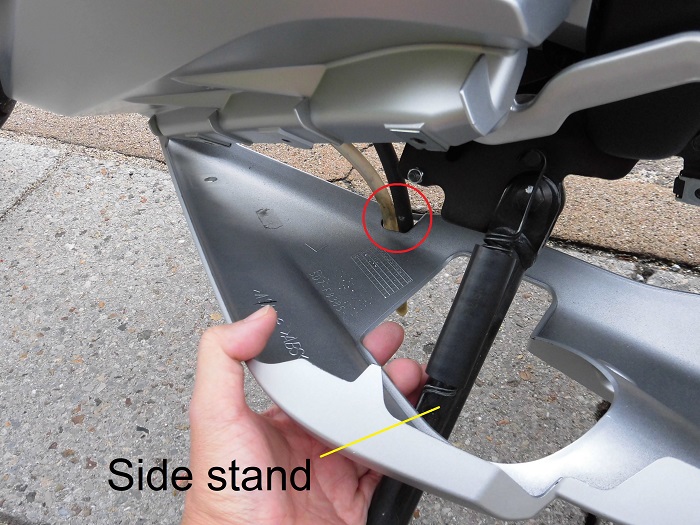
<Remove bottom cowl 3>
The left side differs from the right side in the following points.
- Two hoses through the cowl.
- There is a side stand.
Be especially careful not to hit the cowl on the ground when putting the side stand through.
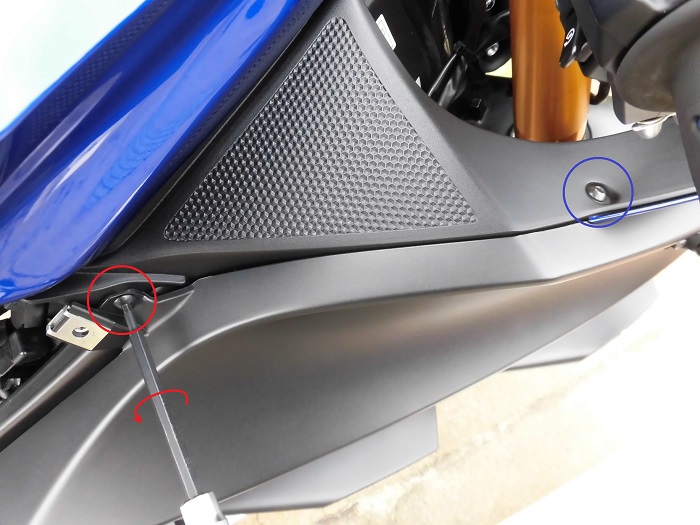
Remove lower side cowl 1
Next, remove the lower side cowl.
The lower side cowl is held in place by a bolt, a tapping screw and three push rivets.

<Remove lower side cowl 1>
Remove the two push rivets on the bottom, which are co-locked with the left side, using a pin punch (3 mm).
Push the middle pin in to unlock and remove it.
I wanted to use a 4 mm pin punch, but it was too long to fit under the cowl, so I used a 3 mm.
Structure of push rivets

<Structure of push rivets>
The following is a summary of how to remove and install the push rivets.
Left: Installed… Wedge works and cannot be removed.
Middle: When removing … Push in the pin and then remove the rivet.
Right: When installing … Push the pin after the rivet has been installed.
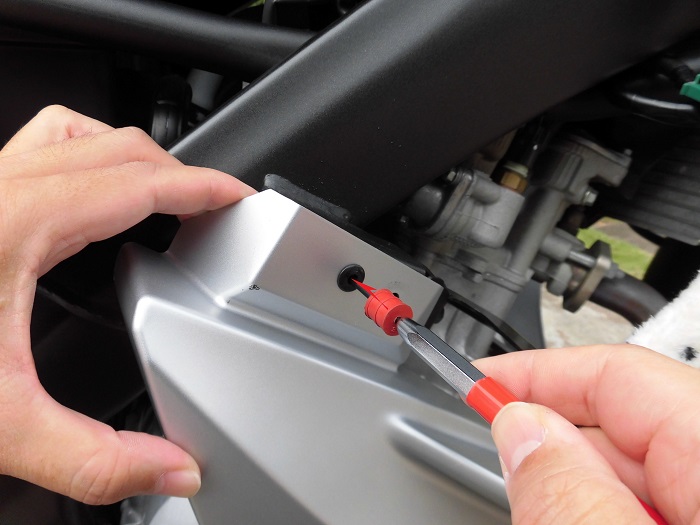
Remove lower side cowl 2
<Remove lower side cowl 2>
○: With a quick spinner fitted with a hexagon socket (4 mm), remove the tapping screw on the left side and the co-securing tapping screw.
○: With a T-bar handle fitted with a hexagon socket (4 mm), remove the bolt on the sides of the lower side cowl.
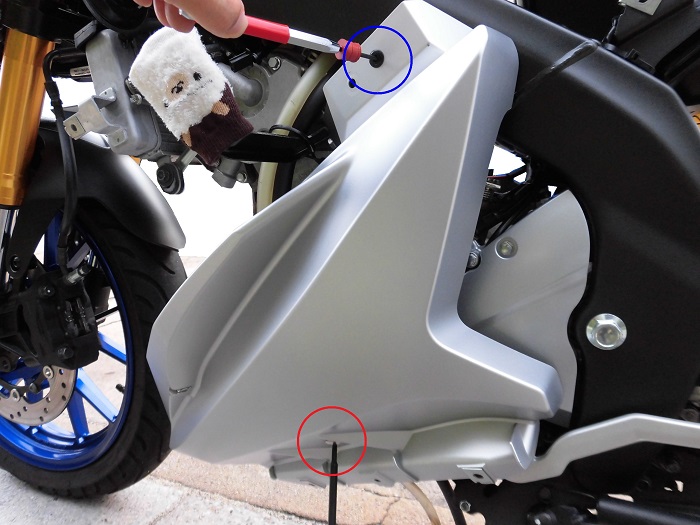
Remove lower side cowl 3
<Remove lower side cowl 3>
While holding the lower side cowl by hand, push the push rivets in with a pin punch (3 mm) and remove.
The lower side cowl can now be removed.
Remove lower side cowl 4
<Remove lower side cowl 4>
Note that the left side can only be removed in the following two places, as it is already separated from the right side.
○: Using a T-bar handle with a hexagon socket (4 mm), remove the bolt on the side of the lower side cowl.
○: Push the push rivet in with a pin punch (3 mm) and remove them.
Bolt and plain washer on left side removed

<Bolt and plain washer on left side removed>
The plain washers are badly deformed in this area because of the recessed area around the hole in the cowl and also because the hole is a large rectangle.
However, I consider it usable and use it as it is.
Hole in the lower side cowl on the right side
The right side is in a similar condition, but the plain washer is not deformed.
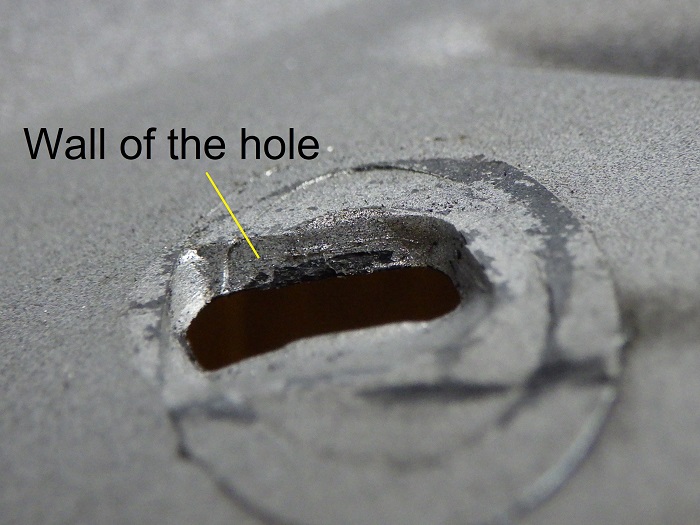
<Hole in the lower side cowl on the right side>
Previously, the previous owner assumed that the hole had been widened,
- The wall of the hole is painted in the same way as the surface
- There are no vertical scratches on the wall of the hole that have been scraped off with a file, etc.
So, I think it was that way from the beginning.
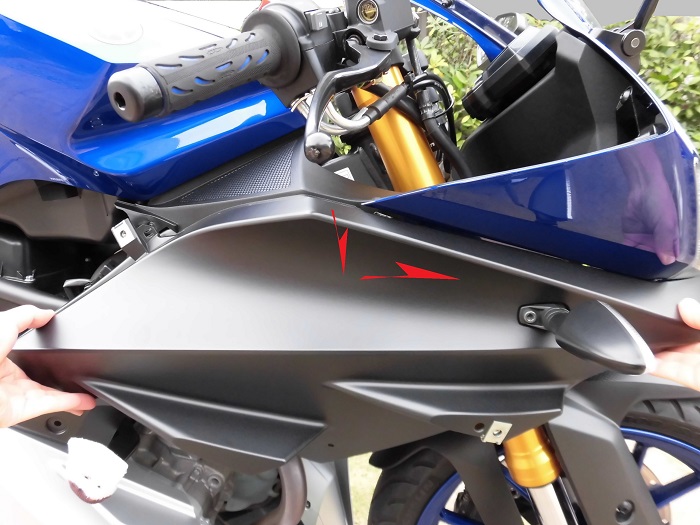
Removed cowls and panels etc.
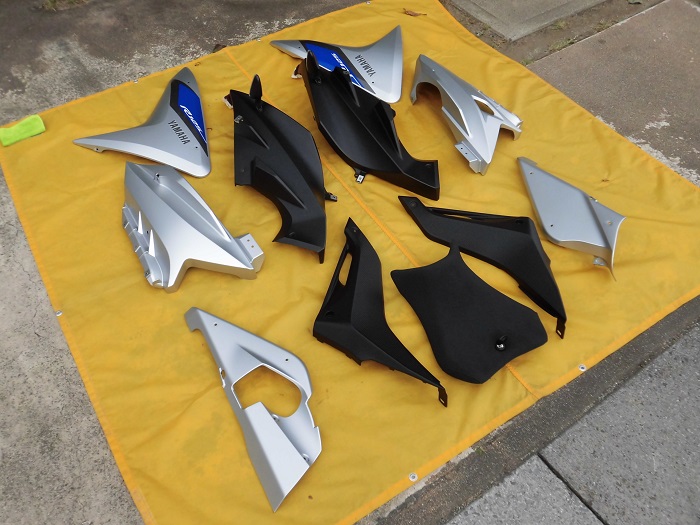
<Removed cowls and panels etc. >
I was able to remove the cowls and panels like this.
After all, it’s a lot of work to remove all this.
It takes up a lot of space just to put the parts in place.
Removed bolts and screws etc.
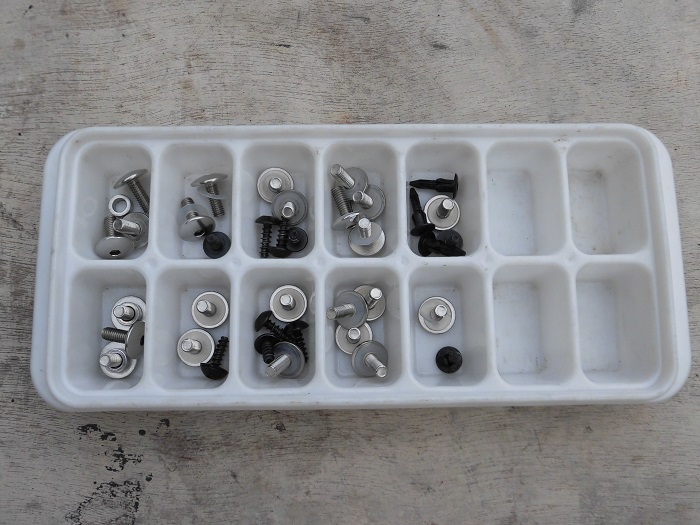
<Removed bolts and screws etc.>
The bolts and other parts that have been removed are placed in the parts tray in the order in which they were removed or by part as far as possible.
This time, there were 37 pieces in total.
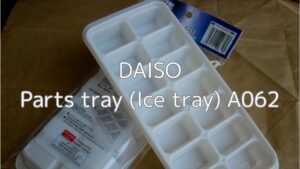
This parts tray is actually an ice tray that I bought at a 100 yen store.
I recommend it because it is very easy to use.
It has two rows, so I can use them separately on the left and right.
With or without plate washers
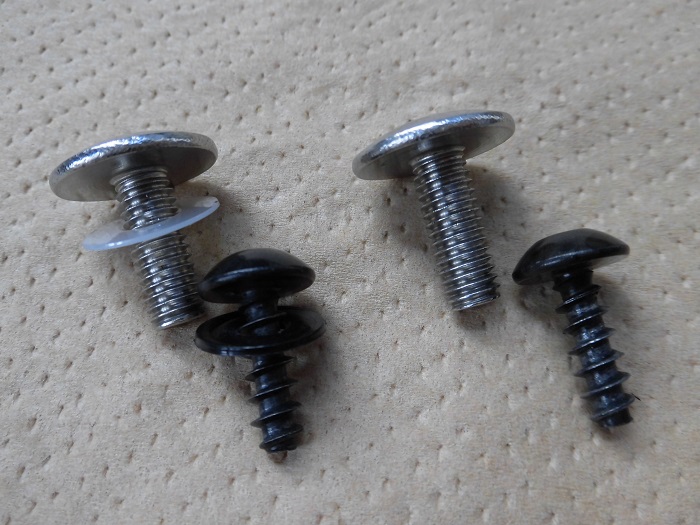
<With or without plate washers>
Plate washers are or aren’t attached to the bolt/tapping screw, depending on the material.
Left: With plate washers… if the material is ABS (cowl).
Right: without plate washers… when the material is PP (panel)
Side cowls, panels, etc. removed.
<Side cowl, panels, etc. removed (From the front)>
Once the cowls and panels are removed, you will notice that it is quite slim.
<Side cowl, panels, etc. removed (From the rear)>
If in this condition,
- Changing engine oil
- Inspecting and replacing plug
- Changing coolant
etc. can be started immediately.
3. Summary
Thank you for taking the time to read this long article.
I wrote 28 STEPs just to remove the cowls and panels.
Once again, I realized how many cowls and panels there are.
I am used to removing and installing them, so personally, it is not such a chore, but I am always worried about where to put the removed cowl panels.
- Be careful not to lose the collar and plate washers when removing them.
- Be careful to protect the cowls and other parts that have been removed.
- It is recommended to prepare a parts tray to keep track of removed bolts.


